bikes

rad-power’s-radster:-a-very-non-radical-commuter-bike

Rad Power’s Radster: A very non-radical commuter bike


The Radster is great as a Class 2 e-bike, but not quite as strong as a Class 3.

With e-bike manufacturing in China having expanded considerably, the number of companies offering affordable e-bikes over the last five years has exploded. But the market for cycles with an electric assist has existed for considerably longer, and a number of companies predate the recent surge. One of them, Rad Power, has been around long enough that it was already an established presence when we first reviewed its hardware four years ago.

The company offers a mix of cargo, folding, and commuter bikes, all with electric assists. Having looked at a cargo version last time around, we decided to try out one of the commuter bikes this time. The Radster comes in road and trail versions (we tried the road). It’s an incredibly solidly made bike with equally solid components, and it has very good implementations of a few things that other manufacturers haven’t handled all that well. It also can switch among the three classes of e-bikes using a menu option; unfortunately, nothing else about the bike’s performance seems to change with the switch.

The Radster is priced a bit higher than a lot of its budget competitors. So, if you’re shopping, you’ll have to think a bit about whether some of these features matter to you.

A solid option

One thing that is very clear early: The Radster is a very solid bike with a robust frame. While the frame is step-through, it has some added bracing just above the cranks. These two bars, one on each side of the frame, link the down tube to the seat tube and extend to form part of the rear triangle. While this means you’ll have to step a bit higher to get in a position to mount the bike, they contribute to the sense that this is a frame that will withstand years of daily use.

Another nice feature: The battery is mounted on top of the frame, so if you release it for charging elsewhere, you don’t have to do anything special to keep it from dropping onto the floor. A chain guard and fenders also come standard, something that’s a big plus for commuters. And the fork has adjustable cushioning to smooth out some of the bumps.

The front fork comes with a bump-smoothing suspension. John Timmer

The one complaint I have is a common one for me: sizing. I’m just short of 190 cm tall (about 6 feet, 2 inches), and a lot of my height is in my legs (I typically go for 35/36-inch inseams). I’ve found that most of the frames rated as “large” still feel a bit short for me. The Radster was no exception, despite being rated for people up to 5 centimeters (2 inches) taller than I am. It was very close to being comfortable but still forced me to raise my thighs above horizontal while pedaling, even with the seat at its maximum height. The geometry of the seat-to-handlebar distance was fine, though.

Also in the “solidly built” category: the rack and kickstand. The rack is rated for 25 kg (55 lbs), so it should be capable of handling a fair amount of errand running. Rad Power will sell you a large cage-style basket to fit there, and there’s everything you need to attach a front basket as well. So, while the Radster is not designated as a cargo bike, it’s flexible enough and well constructed that I wouldn’t hesitate to use it as one.

The Radster doesn’t have internal cable routing, but placing the battery on top of the down tube gave its designers an unusual option. There’s a channel that runs down the bottom of the down tube that the cables sit in, held in place by a plastic cover that’s screwed onto the frame. Should you ever need to do maintenance that involves replacing one of the cables or the hydraulic tubes, it should be a simple matter of removing the cover.

Nice electronics

The basics of the drive system are pretty typical for bikes like this. There’s a Shimano Altus derailleur controlled by a dual-trigger shifter, with a decent spread of eight gears in back. Tektro hydraulic brakes bring things to a stop effectively.

The basic electronics are similarly what you’d expect to see. It’s powered with a 720-watt-hour battery, which Rad Power estimates will get you to over 100 km (65 miles) of range at low assist settings. It’s paired with a rear hub motor rated for 750 watts and 100 Nm of torque, which is more than enough to get even a heavy bike moving quickly. It also features a throttle that will take you to 32 km/hr (20 mph). The electric motor is delightfully quiet most of the time, so you can ride free of any whine unless you’re pushing the speed.

All of the electric components are UL-certified, so you can charge it with minimal worries about the sorts of battery fires that have plagued some no-name e-bike brands.

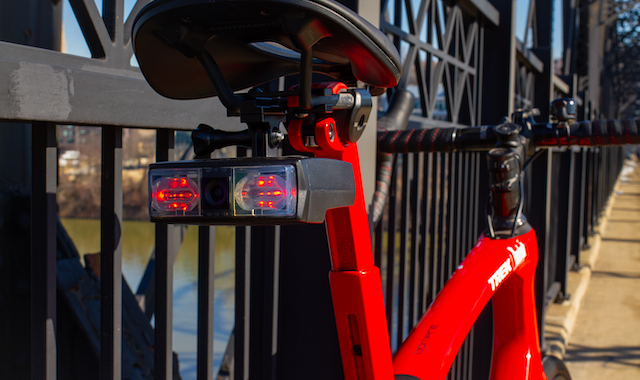
The electronics are also where you’ll find some of Rad Power’s better features. One of these is the rear light, which also acts as a brake light and includes directionals for signaling turns. The brake light is a nice touch on a commuter bike like this, and Rad Power’s directionals actually work effectively. On the bikes we’ve tried in the past, the directionals were triggered by a small three-way toggle switch, which made it impossible to tell if you left them on, or even which direction you might have left them signaling. And that’s a major problem for anyone who’s not used to having turn signals on their bike (meaning almost everyone).

Rad Power’s system uses large, orange arrows on the display to tell you when the directionals are on, and which direction is being signaled. It takes a little while to get used to shutting them off, since you do so by hitting the same switch that activated them—hitting the opposite switch simply activates the opposite turn light. But the display at least makes it easy to tell when you’ve done something wrong.

In general, the display is also bright, easy to read, and displays everything you’d expect it to. It also comes paired with enough buttons to make navigating among settings simple, but not so many that you’re unsure of what button to use in any given context.

One last positive about the electronics: there is a torque sensor, which helps set the assist based on how much force you’re exerting on the cranks, rather than simply determining whether the cranks are turning. While these tend to be a bit more expensive, they provide an assist that’s much better integrated into the cycling you’re doing, which helps with getting started on hills where it might be difficult to get the pedals turning enough to register with a cadence sensor.

On the road

All the stats in the world can’t tell you what it’s going to be like to ride an e-bike, because software plays a critical role. The software can be set up to sacrifice range and battery life to give you effortless pedaling, or it can integrate in a way that simply makes it feel like your leg muscles are more effective than they have any right to be.

The Radster’s software allows it to be switched between a Class 2 and Class 3 assist. Class 2 is intended to have the assist cut out once the bike hits 32 km/hr (20 mph). With a Class 3, that limit rises to 45 km/hour (28 mph). Different states allow different classes, and Rad Power lets you switch between them using on-screen controls, which quite sensibly avoids having to make different models for different states.

As a Class 2, the Radster feels like a very well-rounded e-bike. At the low-assist settings, it’ll make you work to get it up to speed; you’ll bike faster but will still be getting a fair bit of exercise, especially on the hills. And at these settings, it would require a fair amount of effort to get to the point where the speed limit would cause the motor to cut out. Boost the settings to the maximum of the five levels of assist, and you only have to put in minimal effort to get to that limit. You’ll end up going a bit slower than suburban traffic, which can be less than ideal for some commutes, but you’ll get a lot of range in return.

Things are a bit different when the Radster is switched into Class 3 mode. Here, while pedaling with a roughly equal amount of force on flat ground, each level of assist would bring you to a different maximum speed. On setting one, that speed would end up being a bit above 20 km/hour (13 mph)—it was possible to go faster, but it took some work given the heavy frame. By the middle of the assist range, the same amount of effort would get the bike in the neighborhood of 30 kilometers an hour (20 mph). But even with the assist maxed out, it was very difficult to reach the legal 45 km/hour limit (28 mph) for a Class 3 on flat ground—the assist and gearing couldn’t overcome the weight of the bike, even for a regular cyclist like myself.

In the end, I felt the Radster’s electronics and drivetrain provided a more seamless cycling experience in Class 2 mode.

That may be perfectly fine for the sort of biking you’re looking to do. At the same time, if your point in buying a Class 3-capable bike is to be riding it at its maximum assist speed without it feeling like an exercise challenge, then the Rad Power might not be the bike for you. (You may interpret that desire as “I want to be lazy,” but there are a lot of commutes where being able to match the prevailing speed of car traffic would be considerably safer and getting sweaty during the commute is non-ideal.)

The other notable thing about the Radster is its price, which is in the neighborhood of $2,000 ($1,999, to be precise). That places it above city bikes from a variety of competitors, including big-name brands like Trek. And it’s far above the price of some of the recent budget entries in this segment. The case for the Radster is that it has a number of things those others may lack—brake lights and directions, a heavy-duty rack, Class 3 capabilities—and some of those features are also very well implemented. Furthermore, not one component on it made me think: “They went with cheap hardware to meet a price point.” But, given the resulting price, you’ll have to do some careful comparison shopping to determine whether these are things that make a difference for you.

The good

  • Solidly built frame with a top-mounted battery.
  • Easy switching between Class 2 and Class 3 lets you match local laws anywhere in the US.
  • Great info screen and intuitive controls, including the first useful turn signals I’ve tried.
  • Didn’t cheap out on any components.

The bad

  • It’s hard to take full advantage of its Class 3 abilities.
  • Even the large frame won’t be great for taller riders.
  • Price means you’ll want to do some comparison shopping.

The ugly

  • Even the worst aspects fall more under “disappointing” than “ugly.”

Photo of John Timmer

John is Ars Technica’s science editor. He has a Bachelor of Arts in Biochemistry from Columbia University, and a Ph.D. in Molecular and Cell Biology from the University of California, Berkeley. When physically separated from his keyboard, he tends to seek out a bicycle, or a scenic location for communing with his hiking boots.

Rad Power’s Radster: A very non-radical commuter bike Read More »

bicycle-bling:-all-the-accessories-you’ll-need-for-your-new-e-bike

Bicycle bling: All the accessories you’ll need for your new e-bike


To accompany our cargo bike shopper’s guide, here’s the other you’ll want.

Credit: LueratSatichob/Getty Images

If you’ve read our cargo e-bike shopper’s guide, you may be well on your way to owning a new ride. Now comes the fun part.

Part of the joy of diving into a new hobby is researching and acquiring the necessary (and less-than-necessary) stuff. And cycling (or, for the casual or transportation-first rider, “riding bikes”) is no different—there are hundreds of ways to stock up on talismanic, Internet-cool parts and accessories that you may or may not need.

That’s not necessarily a bad thing! And you can even get creative—PC case LEDs serve the same function as a very specific Japanese reflective triangle that hangs from your saddle. But let’s start with the strictly necessary.

This article is aimed at the fully beginner cyclist, but I invite the experienced cyclists among us to fill the comments with anything I’ve missed. If this is your first run at owning a bike that gets ridden frequently, the below is a good starting point to keep you (and your cargo) safe—and your bike running.

First thing’s first: Safety stuff

Helmets

I once was asked by another cargo bike dad, “Are people wearing helmets on these? Is that uncool?”

“You’re already riding the uncoolest bike on earth—buy a helmet,” I told him.

For the most part, any helmet you pick up at a big box store or your local bike shop will do a perfectly fine job keeping your brains inside your skull. Even so, the goodly nerds over at Virginia Tech have partnered with the Insurance Institute for Highways Safety (IIHS) to rate 238 bike helmets using the STAR evaluation system. Sort by your use case and find something within your budget, but I’ve found that something in the $70–$100 range is more than adequate—any less and you’re sacrificing comfort, and any more and you won’t notice the difference. Save your cash.

Giro, Bell, Smith, POC, and Kask are all reputable brands with a wide range of shapes to fit bulbous and diminutive noggins alike.

Additionally, helmets are not “buy it for life” items—manufacturers recommend replacing them every four to five years because the foam and glues degrade with sun exposure. So there’s a built-in upgrade cycle on that one.

Lights

Many cargo e-bikes come with front and rear lights prewired into the electric system. If you opted for an acoustic bike, you’ll want to get some high-lumen visibility from dedicated bike lights (extra bike nerd bonus points for a dynamo system). Front and rear lights can be as cheap as you need or as expensive as you want. Depending on the brands your local bike shop carries, you will find attractive options from Bontraeger, Lezyne, and Knog. Just make sure whatever you’re buying is USB-rechargeable and has the appropriate mounts to fit your bike.

Additionally, you can go full Fast and the Furious and get nuts with cheap, adhesive-backed LEDs for fun and safety. I’ve seen light masts on the back of longtails, and I have my Long John blinged out with LEDs that pulse to music. This is 82 percent for the enjoyment of other bike parents.

A minimalist’s mobile toolkit

You will inevitably blow a tire on the side of the road, or something will rattle loose while your kid is screaming at you. With this in mind, I always have an everything-I-need kit in a zip-top bag in my work backpack. Some version of this assemblage lives on every bike I own in its own seat bag, but on my cargo bike, it’s split between the pockets of the atrociously expensive but very well thought-out Fahrer Panel Bags. This kit includes:

A pocket pump

Lezyne is a ubiquitous name in bike accessories, and for good reason. I’ve had the previous version of their Pocket Drive mini pump for the better part of a decade, and it shows no sign of stopping. What sets this pump apart is the retractable reversible tube that connects to your air valve, providing some necessary flexibility as you angrily pump up a tire on the side of the road. I don’t mess with CO2 canisters because I’ve had too many inflators explode due to user error, and they’re not recommended for tubeless systems, which are starting to be far more common.

If you spend any amount of time on bike Instagram and YouTube, you’ve seen pocketable USB-rechargeable air compressors made to replace manual pumps. We haven’t tested any of the most common models yet, but these could be a solid solution if your budget outweighs your desire to be stuck on the side of the road.

The Pocket Drive HV Pump from Lezyne.

A multi-tool

Depending on the style and vintage of your ride, you’ll have at least two to three different-sized bolts or connectors throughout the frame. If you have thru-axle wheels, you may need a 6 mm hex key to remove them in the event of a flat. Crank Brothers makes what I consider to be the most handsome, no-nonsense multi-tools on the market. They have tools in multiple configurations, allowing you to select the sizes that best apply to your gear—no more, no less.

The M20 minitool from Crank Brothers. Credit: Crankbrothers

Tube + patch kit

As long as you’re not counting grams, the brand of bike tube you use does not matter. Make sure it’s the right size for your wheel and tire combo and that it has the correct inflator valve (there are two styles: Presta and Schrader, with the former being more popular for bikes you’d buy at your local shop). Just go into your local bike shop and buy a bunch and keep them for when you need ’em.

The Park Tool patch kit has vulcanization glue included (I’d recommend avoiding sticker-style patches)—they’re great and cheap, and there’s no excuse for excluding them from your kit. Park Tool makes some really nice bike-specific tools, and they produce This Old House-quality bike repair tutorials hosted by the GOAT Calvin Jones. In the event of a single failure, many riders find it sensible to simply swap the tube and save the patching for when they’re back at their workbench.

With that said, because of their weight and potentially complicated drivetrains, it can be a bit of a pain to get wheels out of a cargo bike to change a tire, so it’s best to practice at home.

A big lock

If you’re regularly locking up outside an office or running errands, you’re going to need to buy (and learn to appropriately use) a lock to protect your investment. I’ve been a happy owner of a few Kryptonite U-Locks over the years, but even these beefy bois are easily defeated by a cordless angle grinder and a few minutes of effort. These days, there are u-locks from Abus, Hiplok, and LiteLok with grinder-resistant coatings that are eye-wateringly expensive, but if your bike costs as much as half of a used Honda Civic, they’re absolutely worth it.

Thing retention

Though you may not always carry stuff, it’s a good idea to be prepared for the day when your grocery run gets out of hand. A small bag with a net, small cam straps, and various sizes of bungee cords has saved my bacon more than once. Looking for a fun gift for the bike parent in your life? Overengineered, beautifully finished cam buckles from Austere Manufacturing are the answer.

Tot totage

Depending on whether we’re on an all-day adventure or just running down to school, I have a rotating inventory of stuff that gets thrown into the front of my bike with my daughter, including:

  • An old UE Wonderboom on a carabiner bumping Frozen club remixes
  • A small bag with snacks and water that goes into a netted area ahead of her feet

And even if it’s not particularly cool, I like to pack a camping blanket like a Rumpl. By the time we’re on our way home, she is invariably tired and wants a place to lay her little helmeted head.

Floor pump

When I first started riding, it didn’t occur to me that one should check their tire pressure before every ride. You don’t have to do this if your tires consistently maintain pressure day-to-day, but I’m a big boy, and it behooves me to call this out. That little pump I recommended above? You don’t want to be using that every day. No, you want what’s called a floor pump.

Silca makes several swervy versions ranging from $150 all the way up to $495. With that said, I’ve had the Lezyne Sport Floor Drive for over 10 years, and I can’t imagine not having it for another 20. Mine has a wood handle, which has taken on some patina and lends a more luxurious feel, and most importantly, it’s totally user-serviceable. This spring, I regreased the seals and changed out the o-rings without any special tools—just a quick trip to the plumbing store. I was also able to upgrade the filler chuck to Lezyne’s new right-angle ABS 1.0 chuck.

The Lezyne Sport Floor Drive 3.5.

No matter what floor pump you go for, at the very least, you’ll want to get one with a pressure gauge. Important tip: Do not just fill your tires to the max pressure on the side of the tire. This will make for an uncomfortable ride, and depending on how fancy of a wheelset you have, it could blow the tire right off the rim. Start with around 80 PSI with 700×28 tires on normal city roads and adjust from there. The days of busting your back at 100 PSI are over, gang.

Hex wrenches

Even if you don’t plan on wrenching on your own bike, it’s handy to have the right tools for making minor fit adjustments and removing your wheels to fix flats. The most commonly used bolts on bikes are metric hex bolts, with Torx bolts used on high-end gear and some small components. A set of Bondhus ball-end Allen wrenches will handle 99 percent of what you need, though fancy German tool manufacturer Wera makes some legitimately drool-worthy wrenches.

If you have blessed your bike with carbon bits (or just want the peace of mind that you’ve cranked down those bolts to the appropriate spec), you may want to pick up a torque wrench. They come in a few flavors geared at the low-torque specs of bikes, in ascending price points and user-friendliness: beam-type, adjustable torque drivers, and ratcheting click wrenches. All should be calibrated at some point, but each comes with its own pros and cons.

Keep in mind that overtightening is just as bad as undertightening because you can crack the component or shear the bolt head off. It happens to the best of us! (Usually after having said, “I don’t feel like grabbing the torque wrench” and just making the clicking sound with your mouth).

Lube

Keeping your chain (fairly) clean and (appropriately) lubricated will extend its life and prolong the life of the rest of your drivetrain. You’ll need to replace the chain once it becomes too worn out, and then every second chain, you’ll want to replace your cassette (the gears). Depending on how well you’ve cared for it, how wet your surroundings are, and how often you’re riding, an 11-speed chain can last anywhere from 1,000 to 1,500 miles, but your mileage may vary.

You can get the max mileage out of your drivetrain by periodically wiping down your chain with an old T-shirt or microfiber towel and reapplying chain lube every 200–300 miles, or counterintuitively, more frequently if you ride less frequently. Your local shop can recommend the lube that best suits your climate and riding environment, but I’m a big fan of Rock’n’Roll Extreme chain lube for my more-or-less dry Northern California rides. The best advice I’ve gotten is that it doesn’t matter what chain lube you use as long as it’s on the chain.

Also, do not use WD-40. That is not a lubricant.

That’s it! There may be a few more items you’ll want to add over time, but this list should give you a great start. Get out there and get riding—and enjoy the hours of further research this article has inevitably prompted.

Bicycle bling: All the accessories you’ll need for your new e-bike Read More »

raspberry-pi-powered-ai-bike-light-detects-cars,-alerts-bikers-to-bad-drivers

Raspberry Pi-powered AI bike light detects cars, alerts bikers to bad drivers

Group ride —

Data from multiple Copilot devices could be used for road safety improvements.

Copilot mounted to the rear of a road bike

Velo AI

Whether or not autonomous vehicles ever work out, the effort put into using small cameras and machine-learning algorithms to detect cars could pay off big for an unexpected group: cyclists.

Velo AI is a firm cofounded by Clark Haynes and Micol Marchetti-Bowick, both PhDs with backgrounds in robotics, movement prediction, and Uber’s (since sold-off) autonomous vehicle work. Copilot, which started as a “pandemic passion project” for Haynes, is essentially car-focused artificial intelligence and machine learning stuffed into a Raspberry Pi Compute Module 4 and boxed up in a bike-friendly size and shape.

A look into the computer vision of the Copilot.

While car-detecting devices exist for bikes, including the Garmin Varia, they’re largely radar-based. That means they can’t distinguish between vehicles of different sizes and only know that something is approaching you, not, for example, how much space it will allow when passing.

Copilot purports to do a lot more:

  • Identify cars, bikes, and pedestrians
  • Alert riders audibly about cars “Following,” “Approaching,” and “Overtaking”
  • Issue visual warning to drivers who are approaching too close or too fast
  • Send visual notifications and a simplified rear road view to an optional paired smartphone
  • Record 1080p video and tag “close calls” and “incidents” from your phone

At 330 grams, with five hours of optimal battery life (and USB-C recharging), it’s not for the aero-obsessed rider or super-long-distance rider. And at $400, it might not speak to the most casual and infrequent cyclist. But it’s an intriguing piece of kit, especially for those who already have, or considered, a Garmin or similar action camera for watching their back. What if a camera could do more than just show you the car after you’re already endangered by it?

Copilot's computer vision can alert riders to cars that are

Copilot’s computer vision can alert riders to cars that are “Following,” “Approaching,” and “Overtaking.”

Velo AI

The Velo team detailed some of their building process for the official Raspberry Pi blog. The Compute Module 4 powers the core system and lights, while a custom Hailo AI co-processor helps with the neural networks and computer vision. An Arducam camera provides the vision and recording.

Beyond individual safety, the Velo AI team hopes that data from Copilots can feed into larger-scale road safety improvements. The team told the Pi blog that they’re starting a partnership with Pittsburgh, seeding Copilots to regular bike commuters and analyzing the aggregate data for potential infrastructure upgrades.

The Copilot is available for sale now and shipping, according to Velo AI. A December 2023 pre-order sold out.

Raspberry Pi-powered AI bike light detects cars, alerts bikers to bad drivers Read More »