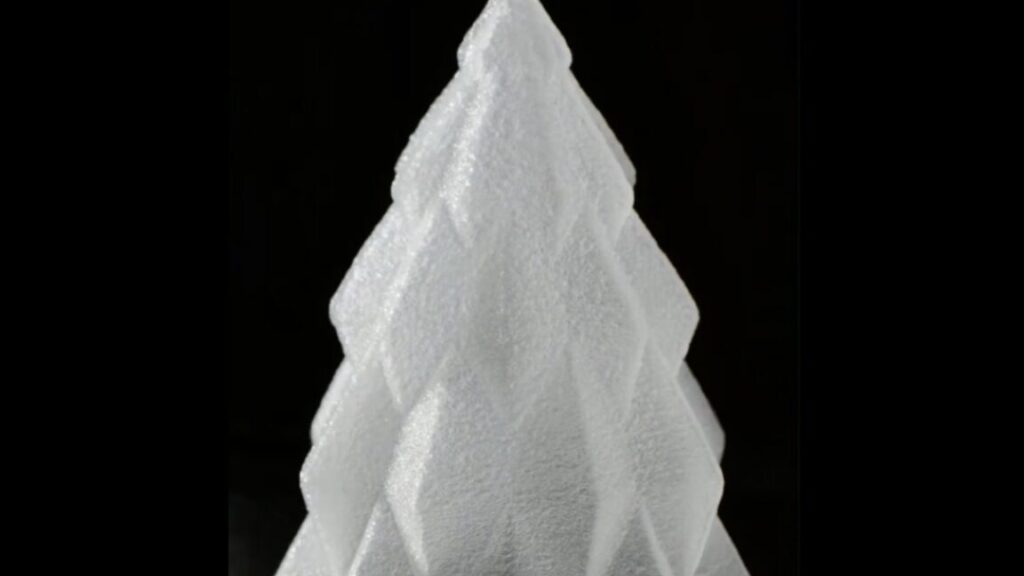
3D printing

endangered-classic-mac-plastic-color-returns-as-3d-printer-filament

Endangered classic Mac plastic color returns as 3D-printer filament

On Tuesday, classic computer collector Joe Strosnider announced the availability of a new 3D-printer filament that replicates the iconic “Platinum” color scheme used in classic Macintosh computers from the late 1980s through the 1990s. The PLA filament (PLA is short for polylactic acid) allows hobbyists to 3D-print nostalgic novelties, replacement parts, and accessories that match the original color of vintage Apple computers.

Hobbyists commonly feed this type of filament into commercial desktop 3D printers, which heat the plastic and extrude it in a computer-controlled way to fabricate new plastic parts.

The Platinum color, which Apple used in its desktop and portable computer lines starting with the Apple IIgs in 1986, has become synonymous with a distinctive era of classic Macintosh aesthetic. Over time, original Macintosh plastics have become brittle and discolored with age, so matching the “original” color can be a somewhat challenging and subjective experience.

A close-up of

A close-up of “Retro Platinum” PLA filament by Polar Filament. Credit: Polar Filament

Strosnider, who runs a website about his extensive vintage computer collection in Ohio, worked for years to color-match the distinctive beige-gray hue of the Macintosh Platinum scheme, resulting in a spool of hobby-ready plastic by Polar Filament and priced at $21.99 per kilogram.

According to a forum post, Strosnider paid approximately $900 to develop the color and purchase an initial 25-kilogram supply of the filament. Rather than keeping the formulation proprietary, he arranged for Polar Filament to make the color publicly available.

“I paid them a fee to color match the speaker box from inside my Mac Color Classic,” Strosnider wrote in a Tinkerdifferent forum post on Tuesday. “In exchange, I asked them to release the color to the public so anyone can use it.”

Endangered classic Mac plastic color returns as 3D-printer filament Read More »

my-3d-printing-journey,-part-2:-printing-upgrades-and-making-mistakes

My 3D printing journey, part 2: Printing upgrades and making mistakes


3D-printing new parts for the A1 taught me a lot about plastic, and other things.

Different plastic filament is good for different things (and some kinds don’t work well with the A1 and other open-bed printers). Credit: Andrew Cunningham

Different plastic filament is good for different things (and some kinds don’t work well with the A1 and other open-bed printers). Credit: Andrew Cunningham

For the last three months or so, I’ve been learning to use (and love) a Bambu Labs A1 3D printer, a big, loud machine that sits on my desk and turns pictures on my computer screen into real-world objects.

In the first part of my series about diving into the wild world of 3D printers, I covered what I’d learned about the different types of 3D printers, some useful settings in the Bambu Studio app (which should also be broadly useful to know about no matter what printer you use), and some initial, magical-feeling successes in downloading files that I turned into useful physical items using a few feet of plastic filament and a couple hours of time.

For this second part, I’m focusing on what I learned when I embarked on my first major project—printing upgrade parts for the A1 with the A1. It was here that I made some of my first big 3D printing mistakes, mistakes that prompted me to read up on the different kinds of 3D printer filament, what each type of filament is good for, and which types the A1 is (and is not) good at handling as an un-enclosed, bed-slinging printer.

As with the information in part one, I share this with you not because it is groundbreaking but because there’s a lot of information out there, and it can be an intimidating hobby to break into. By sharing what I learned and what I found useful early in my journey, I hope I can help other people who have been debating whether to take the plunge.

Adventures in recursion: 3D-printing 3D printer parts

A display cover for the A1’s screen will protect it from wear and tear and allow you to easily hide it when you want to. Credit: Andrew Cunningham

My very first project was a holder for my office’s ceiling fan remote. My second, similarly, was a wall-mounted holder for the Xbox gamepad and wired headset I use with my gaming PC, which normally just had to float around loose on my desk when I wasn’t using them.

These were both relatively quick, simple prints that showed the printer was working like it was supposed to—all of the built-in temperature settings, the textured PEI plate, the printer’s calibration and auto-bed-leveling routines added up to make simple prints as dead-easy as Bambu promised they would be. It made me eager to seek out other prints, including stuff on the Makerworld site I hadn’t thought to try yet.

The first problem I had? Well, as part of its pre-print warmup routine, the A1 spits a couple of grams of filament out and tosses it to the side. This is totally normal—it’s called “purging,” and it gets rid of filament that’s gone brittle from being heated too long. If you’re changing colors, it also clears any last bits of the previous color that are still in the nozzle. But it didn’t seem particularly elegant to have the printer eternally launching little knots of plastic onto my desk.

The A1’s default design just ejects little molten wads of plastic all over your desk when it’s changing or purging filament. This is one of many waste bin (or “poop bucket”) designs made to catch and store these bits and pieces. Credit: Andrew Cunningham

The solution to this was to 3D-print a purging bucket for the A1 (also referred to, of course, as a “poop bucket” or “poop chute.”) In fact, there are tons of purging buckets designed specifically for the A1 because it’s a fairly popular budget model and there’s nothing stopping people from making parts that fit it like a glove.

I printed this bucket, as well as an additional little bracket that would “catch” the purged filament and make sure it fell into the bucket. And this opened the door to my first major printing project: printing additional parts for the printer itself.

I took to YouTube and watched a couple of videos on the topic because I’m apparently far from the first person who has had this reaction to the A1. After much watching and reading, here are the parts I ended up printing:

  • Bambu Lab AMS Lite Top Mount and Z-Axis Stiffener: The Lite version of Bambu’s Automated Materials System (AMS) is the optional accessory that enables multi-color printing for the A1. And like the A1 itself, it’s a lower-cost, open-air version of the AMS that works with Bambu’s more expensive printers.
    • The AMS Lite comes with a stand that you can use to set it next to the A1, but that’s more horizontal space than I had to spare. This top mount is Bambu’s official solution for putting the AMS Lite on top of the A1 instead, saving you some space.
    • The top mount actually has two important components: the top mount itself and a “Z-Axis Stiffener,” a pair of legs that extend behind the A1 to make the whole thing more stable on a desk or table. Bambu already recommends 195 mm (or 7.7 inches) of “safety margin” behind the A1 to give the bed room to sling, so if you’ve left that much space behind the printer, you probably have enough space for these legs.
    • After installing all of these parts, the top mount, and a fully loaded AMS, it’s probably a good idea to run the printer’s calibration cycle again to account for the difference in balance.
    • You may want to print the top mount itself with PETG, which is a bit stronger and more impact-resistant than PLA plastic.
  • A1 Purge Waste Bin and Deflector, by jimbobble. There are approximately 1 million different A1 purge bucket designs, each with its own appeal. But this one is large and simple and includes a version that is compatible with the printer Z-Axis Stiffener legs.
  • A1 rectangular fan cover, by Arzhang Lotfi. There are a bunch of options for this, including fun ones, but you can find dozens of simple grille designs that snap in place and protect the fan on the A1’s print head.
  • Bambu A1 Adjustable Camera Holder, by mlodybuk: This one’s a little more complicated because it does require some potentially warranty-voiding disassembly of components. The A1’s camera is also pretty awful no matter how you position it, with sub-1 FPS video that’s just barely suitable for checking on whether a print has been ruined or not.
    • But if you want to use it, I’d highly recommend moving it from the default location, which is low down and at an odd angle, so you’re not getting the best view of your print that you can.
    • This print includes a redesigned cover for the camera area, a filler piece to fill the hole where the camera used to be to keep dust and other things from getting inside the printer, and a small camera receptacle that snaps in place onto the new cover and can be turned up and down.
    • If you’re not comfortable modding your machine like this, the camera is livable as-is, but this got me a much better vantage point on my prints.

With a little effort, this print allows you to reposition the A1’s camera, giving you a better angle on your prints and making it adjustable. Credit: Andrew Cunningham

  • A1 Screen Protector New Release, by Rox3D: Not strictly necessary, but an unobtrusive way to protect (and to “turn off”) the A1’s built-in LCD screen when it’s not in use. The hinge mechanism of this print is stiff enough that the screen cover can be lifted partway without flopping back down.
  • A1 X-Axis Cover, by Moria3DPStudio: Another only-if-you-want-it print, this foldable cover slides over the A1’s exposed rail when you’re not using it. Just make sure you take it back off before you try to print anything—it won’t break anything, but the printer won’t be happy with you. Not that I’m speaking from experience.
  • Ultimate Filament Spool Enclosure for the AMS Lite, by Supergrapher: Here’s the big one, and it’s a true learning experience for all kinds of things. The regular Bambu AMS system for the P- and X-series printers is enclosed, which is useful not just for keeping dust from settling on your filament spools but for controlling humidity and keeping spools you’ve dried from re-absorbing moisture. There’s no first-party enclosure for the AMS Lite, but this user-created enclosure is flexible and popular, and it can be used to enclose the AMS Lite whether you have it mounted on top of or to the side of the A1. The small plastic clips that keep the lids on are mildly irritating to pop on and off, relative to a lid that you can just lift up and put back down, but the benefits are worth it.
  • 3D Disc for A1 – “Pokéball,” by BS 3D Print: One of the few purely cosmetic parts I’ve printed. The little spinning bit on the front of the A1’s print head shows you when the filament is being extruded, but it’s not a functional part. This is just one of dozens and dozens of cosmetic replacements for it if you choose to pop it off.
  • Sturdy Modular Filament Spool Rack, by Antiphrasis: Not technically an upgrade for the A1, but an easy recommendation for any new 3D printers who suddenly find themselves with a rainbow of a dozen-plus different filaments you want to try. Each shelf here holds three spools of filament, and you can print additional shelves to spread them out either horizontally, vertically, or both, so you can make something that exactly meets your needs and fits your space. A two-by-three shelf gave me room for 18 spools, and I can print more if I need them.

There are some things that others recommend for the A1 that I haven’t printed yet—mainly guides for cables, vibration dampeners for the base, and things to reinforce areas of possible stress for the print head and the A1’s loose, dangly wire.

Part of the fun is figuring out what your problems are, identifying prints that could help solve the problem, and then trying them out to see if they do solve your problem. (The parts have also given my A1 its purple accents, since a bright purple roll of filament was one of the first ones my 5-year-old wanted to get.)

Early mistakes

The “Z-Axis stiffener,” an extra set of legs for the A1 that Bambu recommends if you top-mount your AMS Lite. This took me three tries to print, mainly because of my own inexperience. Credit: Andrew Cunningham

Printing each of these parts gave me a solid crash course into common pitfalls and rookie mistakes.

For example, did you know that ABS plastic doesn’t print well on an open-bed printer? Well, it doesn’t! But I didn’t know that when I bought a spool of ABS to print some parts that I wanted to be sturdier and more resistant to wear and tear. I’d open the window and leave the room to deal with the fumes and be fine, I figured.

I tried printing the Z-Axis Stiffener supports for the A1 in ABS, but they went wonky. Lower bed temperature and (especially) ambient temperature tends to make ABS warp and curl upward, and extrusion-based printers rely on precision to do their thing. Once a layer—any layer!—gets screwed up during a print, that will reverberate throughout the entire rest of the object. Which is why my first attempt at supports ended up being totally unusable.

Large ABS plastic prints are tough to do on an open-bed printer. You can see here how that lower-left corner peeled upward slightly from the print bed, and any unevenness in the foundation of your print is going to reverberate in the layers that are higher up. Credit: Andrew Cunningham

I then tried printing another set of supports with PLA plastic, ones that claimed to maintain their sturdiness while using less infill (that is, how much plastic is actually used inside the print to give it rigidity—around 15 percent is typically a good balance between rigidity and wasting plastic that you’ll never see, though there may be times when you want more or less). I’m still not sure what I did, but the prints I got were squishy and crunchy to the touch, a clear sign that the amount and/or type of infill wasn’t sufficient. It wasn’t until my third try—the original Bambu-made supports, in PLA instead of ABS—that I made supports I could actually use.

An attempt at printing the same part with PLA, but with insufficient infill plastic that left my surfaces rough and the interiors fragile and crunchy. I canceled this one about halfway through when it became clear that something wasn’t right. Credit: Andrew Cunningham

After much reading and research, I learned that for most things, PETG plastic is what you use if you want to make sturdier (and outdoor-friendly) prints on an open bed. Great! I decided I’d print most of the A1 ABS enclosure with clear PETG filament to make something durable that I could also see through when I wanted to see how much filament was left on a given spool.

This ended up being a tricky first experiment with PETG plastic for three different reasons. For one, printing “clear” PETG that actually looks clear is best done with a larger nozzle (Bambu offers 0.2 mm, 0.6 mm, and 0.8 mm nozzles for the A1, in addition to the default 0.4 mm) because you can get the same work done in fewer layers, and the more layers you have, the less “clear” that clear plastic will be. Fine!

The Inland-brand clear PETG+ I bought from our local Micro Center also didn’t love the default temperature settings for generic PETG that the A1 uses, both for the heatbed and the filament itself; plastic flowed unevenly from the nozzle and was prone to coming detached from the bed. If this is happening to you (or if you want to experiment with lowering your temperatures to save a bit of energy), going into Bambu Studio, nudging temperatures by 5 degrees in either direction, and trying a quick test print (I like this one) helped me dial in my settings when using unfamiliar filament.

This homebrewed enclosure for the AMS Lite multi-color filament switcher (and the top mount that sticks it on the top of the printer) has been my biggest and most complex print to date. An 0.8 mm nozzle and some settings changes are recommended to maximize the transparency of transparent PETG filament. Credit: Andrew Cunningham

Finally, PETG is especially prone to absorbing ambient moisture. When that moisture hits a 260° nozzle, it quickly evaporates, and that can interfere with the evenness of the flow rate and the cleanliness of your print (this usually manifests as “stringing,” fine, almost cotton-y strands that hang off your finished prints).

You can buy dedicated filament drying boxes or stick spools in an oven at a low temperature for a few hours if this really bothers you or if it’s significant enough to affect the quality of your prints. One of the reasons to have an enclosure is to create a humidity-controlled environment to keep your spools from absorbing too much moisture in the first place.

The temperature and nozzle-size adjustments made me happy enough with my PETG prints that I was fine to pick off the little fuzzy stringers that were on my prints afterward, but your mileage may vary.

These are just a few examples of the kinds of things you learn if you jump in with both feet and experiment with different prints and plastics in rapid succession. Hopefully, this advice helps you avoid my specific mistakes. But the main takeaway is that experience is the best teacher.

The wide world of plastics

I used filament to print a modular filament shelf for my filaments. Credit: Andrew Cunningham

My wife had gotten me two spools of filament, a white and a black spool of Bambu’s own PLA Basic. What does all of that mean?

No matter what you’re buying, it’s most commonly sold in 1 kilogram spools (the weight of the plastic, not the plastic and the spool together). Each thing you print will give you an estimate of how much filament, in grams, you’ll need to print it.

There are quite a few different types of plastics out there, on Bambu’s site and in other stores. But here are the big ones I found out about almost immediately:

Polylactic acid, or PLA

By far the most commonly used plastic, PLA is inexpensive, available in a huge rainbow of colors and textures, and has a relatively low melting point, making it an easy material for most 3D printers to work with. It’s made of renewable material rather than petroleum, which makes it marginally more environmentally friendly than some other kinds of plastic. And it’s easy to “finish” PLA-printed parts if you’re trying to make props, toys, or other objects that you don’t want to have that 3D printed look about them, whether you’re sanding those parts or using a chemical to smooth the finish.

The downside is that it’s not particularly resilient—sitting in a hot car or in direct sunlight for very long is enough to melt or warp it, which makes it a bad choice for anything that needs to survive outdoors or anything load-bearing. Its environmental bona fides are also a bit oversold—it is biodegradable, but it doesn’t do so quickly outside of specialized composting facilities. If you throw it in the trash and it goes to a landfill, it will still take its time returning to nature.

You’ll find a ton of different kinds of PLA out there. Some have additives that give them a matte or silky texture. Some have little particles of wood or metal or even coffee or spent beer grains embedded in them, meant to endow 3D printed objects with the look, feel, or smell of those materials.

Some PLA just has… some other kind of unspecified additive in it. You’ll see “PLA+” all over the place, but as far as I can tell, there is no industry-wide agreed-upon standard for what the plus is supposed to mean. Manufacturers sometimes claim it’s stronger than regular PLA; other terms like “PLA Pro” and “PLA Max” are similarly non-standardized and vague.

Polyethylene terephthalate glycol, or PETG

PET is a common household plastic, and you’ll find it in everything from clothing fibers to soda bottles. PETG is the same material, with ethylene glycol (the “G”) added to lower the melting point and make it less prone to crystallizing and warping. It also makes it more transparent, though trying to print anything truly “transparent” with an extrusion printer is difficult.

PETG has a higher melting point than PLA, but it’s still lower than other kinds of plastics. This makes PETG a good middle ground for some types of printing. It’s better than PLA for functional load-bearing parts and outdoor use because it’s stronger and able to bend a bit without warping, but it’s still malleable enough to print well on all kinds of home 3D printers.

PETG can still be fussier to work with than PLA. I more frequently had issues with the edges of my PETG prints coming unstuck from the bed of the printer before the print was done.

PETG filament is also especially susceptible to absorbing moisture from the air, which can make extrusion messier. My PETG prints have usually had lots of little wispy strings of plastic hanging off them by the end—not enough to affect the strength or utility of the thing I’ve printed but enough that I needed to pull the strings off to clean up the print once it was done. Drying the filament properly could help with that if I ever need the prints to be cleaner in the first place.

It’s also worth noting that PETG is the strongest kind of filament that an open-bed printer like the A1 can handle reliably. You can succeed with other plastics, but Reddit anecdotes, my own personal experience, and Bambu’s filament guide all point to a higher level of difficulty.

Acrylonitrile butadiene styrene, or ABS

“Going to look at the filament wall at Micro Center” is a legit father-son activity at this point. Credit: Andrew Cunningham

You probably have a lot of ABS plastic in your life. Game consoles and controllers, the plastic keys on most keyboards, Lego bricks, appliances, plastic board game pieces—it’s mostly ABS.

Thin layers of ABS stuck together aren’t as strong or durable as commercially manufactured injection-molded ABS, but it’s still more heat-resistant and durable than 3D-printed PLA or PETG.

There are two big issues specific to ABS, which are also outlined in Bambu’s FAQ for the A1. The first is that it doesn’t print well on an open-bed printer, especially for larger prints. The corners are more prone to pulling up off the print bed, and as with a house, any problems in your foundation will reverberate throughout the rest of your print.

The second is fumes. All 3D-printed plastics emit fumes when they’ve been melted, and a good rule of thumb is to at least print things in a room where you can open the window (and not in a room where anyone or anything sleeps). But ABS and ASA plastics in particular can emit fumes that cause eye and respiratory irritation, headaches, and nausea if you’re printing them indoors with insufficient ventilation.

As for what quantity of printing counts as “dangerous,” there’s no real consensus, and the studies that have been done mostly land in inconclusive “further study is needed” territory. At a bare minimum, it’s considered a best practice to at least be able to open a window if you’re printing with ABS or to use a closed-bed printer in an unoccupied part of your home, like a garage, shed, or workshop space (if you have one).

Acrylonitrile styrene acrylate, or ASA

Described to me by Ars colleague Lee Hutchinson as “ABS but with more UV resistance,” this material is even better suited for outdoor applications than the other plastics on this list.

But also like ABS, you’ll have a hard time getting good results with an open-bed printer, and the fumes are more harmful to inhale. You’ll want a closed-bed printer and decent ventilation for good results.

Thermoplastic polyurethane, or TPU

TPU is best known for its flexibility relative to the other kinds of plastics on this list. It doesn’t get as brittle when it’s cold and has more impact-resistance, and it can print reasonably well on an open-bed printer.

One downside of TPU is that you need to print slowly to get reliably good results—a pain, when even relatively simple fidget toys can take an hour or two to print at full speed using PLA. Longer prints mean more power use and more opportunities for your print to peel off the print bed. A roll of TPU filament will also usually run you a few dollars more than a roll of PLA, PETG, or ABS.

First- or third-party filament?

The first-party Bambu spools have RFID chips in them that Bambu printers can scan to automatically show the type and color of filament that it is and to keep track of how much filament you have remaining. Bambu also has temperature and speed presets for all of its first-party filaments built into the printer and the Bambu Studio software. There are presets for a few other filament brands in the printer, but I usually ended up using the “generic” presets, which may need some tuning to ensure the best possible adhesion to the print bed and extrusion from the nozzle.

I mostly ended up using Inland-branded filament I picked up from my local Micro Center—both because it’s cheaper than Bambu’s first-party stuff and because it’s faster and easier for me to get to. If you don’t have a brick-and-mortar hobby store with filaments in stock, the A1 and other printers sometimes come with some sample filament swatches so you can see the texture and color of the stuff you’re buying online.

What’s next?

Part of the fun of 3D printing is that it can be used for a wide array of projects—organizing your desk or your kitchen, printing out little fidget-toy favors for your kid’s birthday party, printing out replacement parts for little plastic bits and bobs that have broken, or just printing out decorations and other objects you’ll enjoy looking at.

Once you’re armed with all of the basic information in this guide, the next step is really up to you. What would you find fun or useful? What do you need? How can 3D printing help you with other household tasks or hobbies that you might be trying to break into? For the last part of this series, the Ars staffers with 3D printers at home will share some of their favorite prints—hearing people talk about what they’d done themselves really opened my eyes to the possibilities and the utility of these devices, and more personal testimonials may help those of you who are on the fence to climb down off of it.

Photo of Andrew Cunningham

Andrew is a Senior Technology Reporter at Ars Technica, with a focus on consumer tech including computer hardware and in-depth reviews of operating systems like Windows and macOS. Andrew lives in Philadelphia and co-hosts a weekly book podcast called Overdue.

My 3D printing journey, part 2: Printing upgrades and making mistakes Read More »

what-i-learned-from-my-first-few-months-with-a-bambu-lab-a1-3d-printer,-part-1

What I learned from my first few months with a Bambu Lab A1 3D printer, part 1


One neophyte’s first steps into the wide world of 3D printing.

The hotend on my Bambu Lab A1 3D printer. Credit: Andrew Cunningham

The hotend on my Bambu Lab A1 3D printer. Credit: Andrew Cunningham

For a couple of years now, I’ve been trying to find an excuse to buy a decent 3D printer.

Friends and fellow Ars staffers who had them would gush about them at every opportunity, talking about how useful they can be and how much can be printed once you get used to the idea of being able to create real, tangible objects with a little time and a few bucks’ worth of plastic filament.

But I could never quite imagine myself using one consistently enough to buy one. Then, this past Christmas, my wife forced the issue by getting me a Bambu Lab A1 as a present.

Since then, I’ve been tinkering with the thing nearly daily, learning more about what I’ve gotten myself into and continuing to find fun and useful things to print. I’ve gathered a bunch of thoughts about my learning process here, not because I think I’m breaking new ground but to serve as a blueprint for anyone who has been on the fence about Getting Into 3D Printing. “Hyperfixating on new hobbies” is one of my go-to coping mechanisms during times of stress and anxiety, and 3D printing has turned out to be the perfect combination of fun, practical, and time-consuming.

Getting to know my printer

My wife settled on the Bambu A1 because it’s a larger version of the A1 Mini, Wirecutter’s main 3D printer pick at the time (she also noted it was “hella on sale”). Other reviews she read noted that it’s beginner-friendly, easy to use, and fun to tinker with, and it has a pretty active community for answering questions, all assessments I agree with so far.

Note that this research was done some months before Bambu earned bad headlines because of firmware updates that some users believe will lead to a more locked-down ecosystem. This is a controversy I understand—3D printers are still primarily the realm of DIYers and tinkerers, people who are especially sensitive to the closing of open ecosystems. But as a beginner, I’m already leaning mostly on the first-party tools and built-in functionality to get everything going, so I’m not really experiencing the sense of having “lost” features I was relying on, and any concerns I did have are mostly addressed by Bambu’s update about its update.

I hadn’t really updated my preconceived notions of what home 3D printing was since its primordial days, something Ars has been around long enough to have covered in some depth. I was wary of getting into yet another hobby where, like building your own gaming PC, fiddling with and maintaining the equipment is part of the hobby. Bambu’s printers (and those like them) are capable of turning out fairly high-quality prints with minimal fuss, and nothing will draw you into the hobby faster than a few successful prints.

Basic terminology

Extrusion-based 3D printers (also sometimes called “FDM,” for “fused deposition modeling”) work by depositing multiple thin layers of melted plastic filament on a heated bed. Credit: Andrew Cunningham

First things first: The A1 is what’s called an “extrusion” printer, meaning that it functions by melting a long, slim thread of plastic (filament) and then depositing this plastic onto a build plate seated on top of a heated bed in tens, hundreds, or even thousands of thin layers. In the manufacturing world, this is also called “fused deposition modeling,” or FDM. This layer-based extrusion gives 3D-printed objects their distinct ridged look and feel and is also why a 3D printed piece of plastic is less detailed-looking and weaker than an injection-molded piece of plastic like a Lego brick.

The other readily available home 3D printing technology takes liquid resin and uses UV light to harden it into a plastic structure, using a process called “stereolithography” (SLA). You can get inexpensive resin printers in the same price range as the best cheap extrusion printers, and the SLA process can create much more detailed, smooth-looking, and watertight 3D prints (it’s popular for making figurines for tabletop games). Some downsides are that the print beds in these printers are smaller, resin is a bit fussier than filament, and multi-color printing isn’t possible.

There are two main types of home extrusion printers. The Bambu A1 is a Cartesian printer, or in more evocative and colloquial terms, a “bed slinger.” In these, the head of the printer can move up and down on one or two rails and from side to side on another rail. But the print bed itself has to move forward and backward to “move” the print head on the Y axis.

More expensive home 3D printers, including higher-end Bambu models in the P- and X-series, are “CoreXY” printers, which include a third rail or set of rails (and more Z-axis rails) that allow the print head to travel in all three directions.

The A1 is also an “open-bed” printer, which means that it ships without an enclosure. Closed-bed printers are more expensive, but they can maintain a more consistent temperature inside and help contain the fumes from the melted plastic. They can also reduce the amount of noise coming from your printer.

Together, the downsides of a bed-slinger (introducing more wobble for tall prints, more opportunities for parts of your print to come loose from the plate) and an open-bed printer (worse temperature, fume, and dust control) mainly just mean that the A1 isn’t well-suited for printing certain types of plastic and has more potential points of failure for large or delicate prints. My experience with the A1 has been mostly positive now that I know about those limitations, but the printer you buy could easily change based on what kinds of things you want to print with it.

Setting up

Overall, the setup process was reasonably simple, at least for someone who has been building PCs and repairing small electronics for years now. It’s not quite the same as the “take it out of the box, remove all the plastic film, and plug it in” process of setting up a 2D printer, but the directions in the start guide are well-illustrated and clearly written; if you can put together prefab IKEA furniture, that’s roughly the level of complexity we’re talking about here. The fact that delicate electronics are involved might still make it more intimidating for the non-technical, but figuring out what goes where is fairly simple.

The only mistake I made while setting the printer up involved the surface I initially tried to put it on. I used a spare end table, but as I discovered during the printer’s calibration process, the herky-jerky movement of the bed and print head was way too much for a little table to handle. “Stable enough to put a lamp on” is not the same as “stable enough to put a constantly wobbling contraption” on—obvious in retrospect, but my being new to this is why this article exists.

After some office rearrangement, I was able to move the printer to my sturdy L-desk full of cables and other doodads to serve as ballast. This surface was more than sturdy enough to let the printer complete its calibration process—and sturdy enough not to transfer the printer’s every motion to our kid’s room below, a boon for when I’m trying to print something after he has gone to bed.

The first-party Bambu apps for sending files to the printer are Bambu Handy (for iOS/Android, with no native iPad version) and Bambu Studio (for Windows, macOS, and Linux). Handy works OK for sending ready-made models from MakerWorld (a mostly community-driven but Bambu-developer repository for 3D printable files) and for monitoring prints once they’ve started. But I’ll mostly be relaying my experience with Bambu Studio, a much more fully featured app. Neither app requires sign-in, at least not yet, but the path of least resistance is to sign into your printer and apps with the same account to enable easy communication and syncing.

Bambu Studio: A primer

Bambu Studio is what’s known in the hobby as a “slicer,” software that takes existing 3D models output by common CAD programs (Tinkercad, FreeCAD, SolidWorks, Autodesk Fusion, others) and converts them into a set of specific movement instructions that the printer can follow. Bambu Studio allows you to do some basic modification of existing models—cloning parts, resizing them, adding supports for overhanging bits that would otherwise droop down, and a few other functions—but it’s primarily there for opening files, choosing a few settings, and sending them off to the printer to become tangible objects.

Bambu Studio isn’t the most approachable application, but if you’ve made it this far, it shouldn’t be totally beyond your comprehension. For first-time setup, you’ll choose your model of printer (all Bambu models and a healthy selection of third-party printers are officially supported), leave the filament settings as they are, and sign in if you want to use Bambu’s cloud services. These sync printer settings and keep track of the models you save and download from MakerWorld, but a non-cloud LAN mode is available for the Bambu skeptics and privacy-conscious.

For any newbie, pretty much all you need to do is connect your printer, open a .3MF or .STL file you’ve downloaded from MakerWorld or elsewhere, select your filament from the drop-down menu, click “slice plate,” and then click “print.” Things like the default 0.4 mm nozzle size and Bambu’s included Textured PEI Build Plate are generally already factored in, though you may need to double-check these selections when you open a file for the first time.

When you slice your build plate for the first time, the app will spit a pile of numbers back at you. There are two important ones for 3D printing neophytes to track. One is the “total filament” figure, which tells you how many grams of filament the printer will use to make your model (filament typically comes in 1 kg spools, and the printer generally won’t track usage for you, so if you want to avoid running out in the middle of the job, you may want to keep track of what you’re using). The second is the “total time” figure, which tells you how long the entire print will take from the first calibration steps to the end of the job.

Selecting your filament and/or temperature presets. If you have the Automatic Material System (AMS), this is also where you’ll manage multicolor printing. Andrew Cunningham

When selecting filament, people who stick to Bambu’s first-party spools will have the easiest time, since optimal settings are already programmed into the app. But I’ve had almost zero trouble with the “generic” presets and the spools of generic Inland-branded filament I’ve bought from our local Micro Center, at least when sticking to PLA (polylactic acid, the most common and generally the easiest-to-print of the different kinds of filament you can buy). But we’ll dive deeper into plastics in part 2 of this series.

I won’t pretend I’m skilled enough to do a deep dive on every single setting that Bambu Studio gives you access to, but here are a few of the odds and ends I’ve found most useful:

  • The “clone” function, accessed by right-clicking an object and clicking “clone.” Useful if you’d like to fit several copies of an object on the build plate at once, especially if you’re using a filament with a color gradient and you’d like to make the gradient effect more pronounced by spreading it out over a bunch of prints.
  • The “arrange all objects” function, the fourth button from the left under the “prepare” tab. Did you just clone a bunch of objects? Did you delete an individual object from a model because you didn’t need to print that part? Bambu Studio will arrange everything on your build plate to optimize the use of space.
  • Layer height, located in the sidebar directly beneath “Process” (which is directly underneath the area where you select your filament. For many functional parts, the standard 0.2 mm layer height is fine. Going with thinner layer heights adds to the printing time but can preserve more detail on prints that have a lot of it and slightly reduce the visible layer lines that give 3D-printed objects their distinct look (for better or worse). Thicker layer heights do the opposite, slightly reducing the amount of time a model takes to print but preserving less detail.
  • Infill percentage and wall loops, located in the Strength tab beneath the “Process” sidebar item. For most everyday prints, you don’t need to worry about messing with these settings much; the infill percentage determines the amount of your print’s interior that’s plastic and the part that’s empty space (15 percent is a good happy medium most of the time between maintaining rigidity and overusing plastic). The number of wall loops determines how many layers the printer uses for the outside surface of the print, with more walls using more plastic but also adding a bit of extra strength and rigidity to functional prints that need it (think hooks, hangers, shelves and brackets, and other things that will be asked to bear some weight).

My first prints

A humble start: My very first print was a wall bracket for the remote for my office’s ceiling fan. Credit: Andrew Cunningham

When given the opportunity to use a 3D printer, my mind went first to aggressively practical stuff—prints for organizing the odds and ends that eternally float around my office or desk.

When we moved into our current house, only one of the bedrooms had a ceiling fan installed. I put up remote-controlled ceiling fans in all the other bedrooms myself. And all those fans, except one, came with a wall-mounted caddy to hold the remote control. The first thing I decided to print was a wall-mounted holder for that remote control.

MakerWorld is just one of several resources for ready-made 3D-printable files, but the ease with which I found a Hampton Bay Ceiling Fan Remote Wall Mount is pretty representative of my experience so far. At this point in the life cycle of home 3D printing, if you can think about it and it’s not a terrible idea, you can usually find someone out there who has made something close to what you’re looking for.

I loaded up my black roll of PLA plastic—generally the cheapest, easiest-to-buy, easiest-to-work-with kind of 3D printer filament, though not always the best for prints that need more structural integrity—into the basic roll-holder that comes with the A1, downloaded that 3MF file, opened it in Bambu Studio, sliced the file, and hit print. It felt like there should have been extra steps in there somewhere. But that’s all it took to kick the printer into action.

After a few minutes of warmup—by default, the A1 has a thorough pre-print setup process where it checks the levelness of the bed and tests the flow rate of your filament for a few minutes before it begins printing anything—the nozzle started laying plastic down on my build plate, and inside of an hour or so, I had my first 3D-printed object.

Print No. 2 was another wall bracket, this time for my gaming PC’s gamepad and headset. Credit: Andrew Cunningham

It wears off a bit after you successfully execute a print, but I still haven’t quite lost the feeling of magic of printing out a fully 3D object that comes off the plate and then just exists in space along with me and all the store-bought objects in my office.

The remote holder was, as I’d learn, a fairly simple print made under near-ideal conditions. But it was an easy success to start off with, and that success can help embolden you and draw you in, inviting more printing and more experimentation. And the more you experiment, the more you inevitably learn.

This time, I talked about what I learned about basic terminology and the different kinds of plastics most commonly used by home 3D printers. Next time, I’ll talk about some of the pitfalls I ran into after my initial successes, what I learned about using Bambu Studio, what I’ve learned about fine-tuning settings to get good results, and a whole bunch of 3D-printable upgrades and mods available for the A1.

Photo of Andrew Cunningham

Andrew is a Senior Technology Reporter at Ars Technica, with a focus on consumer tech including computer hardware and in-depth reviews of operating systems like Windows and macOS. Andrew lives in Philadelphia and co-hosts a weekly book podcast called Overdue.

What I learned from my first few months with a Bambu Lab A1 3D printer, part 1 Read More »

how-3d-printing-is-personalizing-health care

How 3D printing is personalizing health care


Prosthetics are becoming increasing affordable and accessible thanks to 3D printers.

Three-dimensional printing is transforming medical care, letting the health care field shift from mass-produced solutions to customized treatments tailored to each patient’s needs. For instance, researchers are developing 3D-printed prosthetic hands specifically designed for children, made with lightweight materials and adaptable control systems.

These continuing advancements in 3D-printed prosthetics demonstrate their increasing affordability and accessibility. Success stories like this one in personalized prosthetics highlight the benefits of 3D printing, in which a model of an object produced with computer-aided design software is transferred to a 3D printer and constructed layer by layer.

We are a biomedical engineer and a chemist who work with 3D printing. We study how this rapidly evolving technology provides new options not just for prosthetics but for implants, surgical planning, drug manufacturing, and other health care needs. The ability of 3D printing to make precisely shaped objects in a wide range of materials has led to, for example, custom replacement joints and custom-dosage, multidrug pills.

Better body parts

Three-dimensional printing in health care started in the 1980s with scientists using technologies such as stereolithography to create prototypes layer by layer. Stereolithography uses a computer-controlled laser beam to solidify a liquid material into specific 3D shapes. The medical field quickly saw the potential of this technology to create implants and prosthetics designed specifically for each patient.

One of the first applications was creating tissue scaffolds, which are structures that support cell growth. Researchers at Boston Children’s Hospital combined these scaffolds with patients’ own cells to build replacement bladders. The patients remained healthy for years after receiving their implants, demonstrating that 3D-printed structures could become durable body parts.

As technology progressed, the focus shifted to bioprinting, which uses living cells to create working anatomical structures. In 2013, Organovo created the world’s first 3D-bioprinted liver tissue, opening up exciting possibilities for creating organs and tissues for transplantation. But while significant advances have been made in bioprinting, creating full, functional organs such as livers for transplantation remains experimental. Current research focuses on developing smaller, simpler tissues and refining bioprinting techniques to improve cell viability and functionality. These efforts aim to bridge the gap between laboratory success and clinical application, with the ultimate goal of providing viable organ replacements for patients in need.

Three-dimensional printing already has revolutionized the creation of prosthetics. It allows prosthetics makers to produce affordable custom-made devices that fit the patient perfectly. They can tailor prosthetic hands and limbs to each individual and easily replace them as a child grows.

Three-dimensionally printed implants, such as hip replacements and spine implants, offer a more precise fit, which can improve how well they integrate with the body. Traditional implants often come only in standard shapes and sizes.

Some patients have received custom titanium facial implants after accidents. Others had portions of their skulls replaced with 3D-printed implants.

Additionally, 3D printing is making significant strides in dentistry. Companies such as Invisalign use 3D printing to create custom-fit aligners for teeth straightening, demonstrating the ability to personalize dental care.

Scientists are also exploring new materials for 3D printing, such as self-healing bioglass that might replace damaged cartilage. Moreover, researchers are developing 4D printing, which creates objects that can change shape over time, potentially leading to medical devices that can adapt to the body’s needs.

For example, researchers are working on 3D-printed stents that can respond to changes in blood flow. These stents are designed to expand or contract as needed, reducing the risk of blockage and improving long-term patient outcomes.

Simulating surgeries

Three-dimensionally printed anatomical models often help surgeons understand complex cases and improve surgical outcomes. These models, created from medical images such as X-rays and CT scans, allow surgeons to practice procedures before operating.

For instance, a 3D-printed model of a child’s heart enables surgeons to simulate complex surgeries. This approach can lead to shorter operating times, fewer complications, and lower costs.

Personalized pharmaceuticals

In the pharmaceutical industry, drugmakers can three-dimensionally print personalized drug dosages and delivery systems. The ability to precisely layer each component of a drug means that they can make medicines with the exact dose needed for each patient. The 3D-printed anti-epileptic drug Spritam was approved by the Food and Drug Administration in 2015 to deliver very high dosages of its active ingredient.

Drug production systems that use 3D printing are finding homes outside pharmaceutical factories. The drugs potentially can be made and delivered by community pharmacies. Hospitals are starting to use 3D printing to make medicine on-site, allowing for personalized treatment plans based on factors such as the patient’s age and health.

However, it’s important to note that regulations for 3D-printed drugs are still being developed. One concern is that postprinting processing may affect the stability of drug ingredients. It’s also important to establish clear guidelines and decide where 3D printing should take place – whether in pharmacies, hospitals or even at home. Additionally, pharmacists will need rigorous training in these new systems.

Printing for the future

Despite the extraordinarily rapid progress overall in 3D printing for health care, major challenges and opportunities remain. Among them is the need to develop better ways to ensure the quality and safety of 3D-printed medical products. Affordability and accessibility also remain significant concerns. Long-term safety concerns regarding implant materials, such as potential biocompatibility issues and the release of nanoparticles, require rigorous testing and validation.

While 3D printing has the potential to reduce manufacturing costs, the initial investment in equipment and materials can be a barrier for many health care providers and patients, especially in underserved communities. Furthermore, the lack of standardized workflows and trained personnel can limit the widespread adoption of 3D printing in clinical settings, hindering access for those who could benefit most.

On the bright side, artificial intelligence techniques that can effectively leverage vast amounts of highly detailed medical data are likely to prove critical in developing improved 3D-printed medical products. Specifically, AI algorithms can analyze patient-specific data to optimize the design and fabrication of 3D-printed implants and prosthetics. For instance, implant makers can use AI-driven image analysis to create highly accurate 3D models from CT scans and MRIs that they can use to design customized implants.

Furthermore, machine learning algorithms can predict the long-term performance and potential failure points of 3D-printed prosthetics, allowing prosthetics designers to optimize for improved durability and patient safety.

Three-dimensional printing continues to break boundaries, including the boundary of the body itself. Researchers at the California Institute of Technology have developed a technique that uses ultrasound to turn a liquid injected into the body into a gel in 3D shapes. The method could be used one day for delivering drugs or replacing tissue.

Overall, the field is moving quickly toward personalized treatment plans that are closely adapted to each patient’s unique needs and preferences, made possible by the precision and flexibility of 3D printing.The Conversation

Anne Schmitz, Associate Professor of Engineering, University of Wisconsin-Stout and Daniel Freedman, Dean of the College of Science, Technology, Engineering, Mathematics & Management, University of Wisconsin-Stout. This article is republished from The Conversation under a Creative Commons license. Read the original article.

Photo of The Conversation

The Conversation is an independent source of news and views, sourced from the academic and research community. Our team of editors work with these experts to share their knowledge with the wider public. Our aim is to allow for better understanding of current affairs and complex issues, and hopefully improve the quality of public discourse on them.

How 3D printing is personalizing health care Read More »

japanese-railway-shelter-replaced-in-less-than-6-hours-by-3d-printed-model

Japanese railway shelter replaced in less than 6 hours by 3D-printed model

Hatsushima is not a particularly busy station, relative to Japanese rail commuting as a whole. It serves a town (Arida) of about 25,000, known for mandarin oranges and scabbardfish, that is shrinking in population, like most of Japan. Its station sees between one to three trains per hour at its stop, helping about 530 riders find their way. Its wooden station was due for replacement, and the replacement could be smaller.

The replacement, it turned out, could also be a trial for industrial-scale 3D-printing of custom rail shelters. Serendix, a construction firm that previously 3D-printed 538-square-foot homes for about $38,000, built a shelter for Hatsushima in about seven days, as shown at The New York Times. The fabricated shelter was shipped in four parts by rail, then pieced together in a span that the site Futurism says is “just under three hours,” but which the Times, seemingly present at the scene, pegs at six. It was in place by the first train’s arrival at 5: 45 am.

Either number of hours is a marked decrease from the days or weeks you might expect for a new rail station to be constructed. In one overnight, teams assembled a shelter that is 2.6 meters (8.5 feet) tall and 10 square meters (32 square feet) in area. It’s not actually in use yet, as it needs ticket machines and finishing, but is expected to operate by July, according to the Japan Times.

Japanese railway shelter replaced in less than 6 hours by 3D-printed model Read More »

bambu-lab-pushes-a-“control-system”-for-3d-printers,-and-boy,-did-it-not-go-well

Bambu Lab pushes a “control system” for 3D printers, and boy, did it not go well

Bambu Lab, a major maker of 3D printers for home users and commercial “farms,” is pushing an update to its devices that it claims will improve security while still offering third-party tools “authorized” access. Some in the user community—and 3D printing advocates broadly—are pushing back, suggesting the firm has other, more controlling motives.

As is perhaps appropriate for 3D printing, this matter has many layers, some long-standing arguments about freedom and rights baked in, and a good deal of heat.

Bambu Lab’s image marketing Bambu Handy, its cloud service that allows you to “Control your printer anytime anywhere, also we support SD card and local network to print the projects.”

Credit: Bambu Lab

Bambu Lab’s image marketing Bambu Handy, its cloud service that allows you to “Control your printer anytime anywhere, also we support SD card and local network to print the projects.” Credit: Bambu Lab

Printing more, tweaking less

Bambu Lab, launched in 2022, has stood out in the burgeoning consumer 3D printing market because of its printers’ capacity for printing at high speeds without excessive tinkering or maintenance. The product page for the X1 series, the printer first targeted for new security, starts with the credo, “We hated 3D printing as much as we loved it.” Bambu’s faster, less fussy multicolor printers garnered attention—including an ongoing patent lawsuit from established commercial printer Stratasys.

Part of Bambu’s “just works” nature relies on a relatively more closed system than its often open-minded counterparts. Sending a print to most Bambu printers typically requires either Bambu’s cloud service, or, in “LAN mode,” a manual “sneakernet” transfer through SD cards. Cloud connections also grant perks like remote monitoring, and many customers have accepted the trade-off.

However, other customers, eager to tinker with third-party software and accessories, along with those fearing a subscription-based future for 3D printing, see Bambu Lab’s purported security concerns as something else. And Bambu acknowledges that its messaging on its upcoming change came out in rough shape.

Authorized access and operations

Firmware Update Introducing New Authorization Control System,” posted by Bambu Lab on January 16 (and since updated twice), states that Bambu’s printers—starting with its popular X series, then the P and A lines—will receive a “significant security enhancement to ensure only authorized access and operations are permitted.” This would, Bambu suggested, mitigate risks of “remote hacks or printer exposure issues” and lower the risk of “abnormal traffic or attacks.”

Bambu Lab pushes a “control system” for 3D printers, and boy, did it not go well Read More »

how-nascar-and-its-teams-are-embracing-3d-printing

How NASCAR and its teams are embracing 3D printing

Carbon fiber, aluminum, maybe the odd bit of titanium here or there: These are the materials we usually expect race cars to be made of. Now you can start adding thermoplastics like Ultem to the list. Additive manufacturing has become a real asset in the racer’s toolbox, although the technology has actually been used at the track longer than you might think.

“Some people think that 3D printing was invented last year,” said Fadi Abro, senior global director of automotive and mobility at Stratasys. The company recently became NASCAR’s official 3D printing partner, but it has a relationship with one of the teams—Joe Gibbs Racing—that stretches back two decades.

“Now the teams only have certain things that they can touch in the vehicle, but what that does is it makes it so that every microscopic advantage you can get out of that one tiny detail that you have control over is so meaningful to your team,” Abro said.

Currently, JGR has five printers, which it uses in a variety of applications. Some are common to other industries—additive manufacturing is a good way to quickly develop new prototypes, as well as tooling and fixtures. But the team also prints parts that go straight onto the race car, like housings, ducts, and brackets.

“These are elements that are really integral for the vehicle to be on the track. If there are changes they want to make, they throw it to the printer, it prints overnight, and you have a part that can go on a track that’s specific to that track. So that gives them a competitive advantage,” Abro said.

How NASCAR and its teams are embracing 3D printing Read More »

green-sea-turtle-gets-relief-from-“bubble-butt”-syndrome-thanks-to-3d-printing

Green sea turtle gets relief from “bubble butt” syndrome thanks to 3D printing

Two main reasons those gas pockets appear in turtles are plastics and boat strikes.

When a turtle consumes something it can’t digest—like parts of fishing nets, plastic bottles, or even rubber gloves (yes, there was a sea turtle found with a rubber glove in its intestines)—it sometimes gets stuck somewhere along its gastrointestinal tract. This, in turn, causes gases to gather there, which throws the turtle’s buoyancy out of balance.

Those gases usually gather in the parts of the gastrointestinal tract located near the rear of the turtle, so the animal is left floating bum-up at an unnatural angle. Conditions like that are sometimes curable with dietary modifications, assisted feeding, fluid therapy, and other non-invasive means to the point where afflicted animals can be safely released back into the wild. Boat strikes, on the other hand, often lead to permanent damage.

Sea turtles’ shells are tough but not tough enough to withstand a boat impact, especially when the shell gets hit by a propeller blade. This often leaves a shell deformed, with air bubbles trapped underneath it. In more severe cases, the spinal cord under the shell also gets damaged, which leads to complete or partial paralysis.“

The most popular approach to rehabilitating these injuries relies on gluing Velcro patches to the shell at carefully chosen spots and attaching weights to those patches to counteract the buoyancy caused by the air bubbles. This is a pretty labor-intensive task that has to be done repeatedly every few months for the rest of the turtle’s life. And green sea turtles can live as long as 80 years.

Charlotte swimming with the harness on.

Credit: Laura Shubel

Charlotte swimming with the harness on. Credit: Laura Shubel

Harnessing advanced manufacturing

Charlotte, as a boat strike victim with air bubbles trapped under its deformed shell, was considered non-releasable and completely dependent on human care. Since full recovery was not an option, Mystic Aquarium wanted to make everyday functioning more bearable for both the turtle and its caretakers. It got in touch with Adia, which in turn got New Balance and Formlabs onboard. Their idea was to get rid of the Velcro and replace them with a harness fitted with slots for weights.

Green sea turtle gets relief from “bubble butt” syndrome thanks to 3D printing Read More »

cheerios-effect-inspires-novel-robot-design

Cheerios effect inspires novel robot design

There’s a common popular science demonstration involving “soap boats,” in which liquid soap poured onto the surface of water creates a propulsive flow driven by gradients in surface tension. But it doesn’t last very long since the soapy surfactants rapidly saturate the water surface, eliminating that surface tension. Using ethanol to create similar “cocktail boats” can significantly extend the effect because the alcohol evaporates rather than saturating the water.

That simple classroom demonstration could also be used to propel tiny robotic devices across liquid surfaces to carry out various environmental or industrial tasks, according to a preprint posted to the physics arXiv. The authors also exploited the so-called “Cheerios effect” as a means of self-assembly to create clusters of tiny ethanol-powered robots.

As previously reported, those who love their Cheerios for breakfast are well acquainted with how those last few tasty little “O”s tend to clump together in the bowl: either drifting to the center or to the outer edges. The “Cheerios effect is found throughout nature, such as in grains of pollen (or, alternatively, mosquito eggs or beetles) floating on top of a pond; small coins floating in a bowl of water; or fire ants clumping together to form life-saving rafts during floods. A 2005 paper in the American Journal of Physics outlined the underlying physics, identifying the culprit as a combination of buoyancy, surface tension, and the so-called “meniscus effect.”

It all adds up to a type of capillary action. Basically, the mass of the Cheerios is insufficient to break the milk’s surface tension. But it’s enough to put a tiny dent in the surface of the milk in the bowl, such that if two Cheerios are sufficiently close, the curved surface in the liquid (meniscus) will cause them to naturally drift toward each other. The “dents” merge and the “O”s clump together. Add another Cheerio into the mix, and it, too, will follow the curvature in the milk to drift toward its fellow “O”s.

Physicists made the first direct measurements of the various forces at work in the phenomenon in 2019. And they found one extra factor underlying the Cheerios effect: The disks tilted toward each other as they drifted closer in the water. So the disks pushed harder against the water’s surface, resulting in a pushback from the liquid. That’s what leads to an increase in the attraction between the two disks.

Cheerios effect inspires novel robot design Read More »

“impact-printing”-is-a-cement-free-alternative-to-3d-printed-structures

“Impact printing” is a cement-free alternative to 3D-printed structures

Recently, construction company ICON announced that it is close to completing the world’s largest 3D-printed neighborhood in Georgetown, Texas. This isn’t the only 3D-printed housing project. Hundreds of 3D-printed homes are under construction in the US and Europe, and more such housing projects are in the pipeline.

There are many factors fueling the growth of 3D printing in the construction industry. It reduces the construction time; a home that could take months to build can be constructed within days or weeks with a 3D printer. Compared to traditional methods, 3D printing also reduces the amount of material that ends up as waste during construction. These advantages lead to reduced labor and material costs, making 3D printing an attractive choice for construction companies.

A team of researchers from the Swiss Federal Institute of Technology (ETH) Zurich, however, claims to have developed a robotic construction method that is even better than 3D printing. They call it impact printing, and instead of typical construction materials, it uses Earth-based materials such as sand, silt, clay, and gravel to make homes. According to the researchers, impact printing is less carbon-intensive and much more sustainable and affordable than 3D printing.

This is because Earth-based materials are abundant, recyclable, available at low costs, and can even be excavated at the construction site. “We developed a robotic tool and a method that could take common material, which is the excavated material on construction sites, and turn it back into usable building products, at low cost and efficiently, with significantly less CO2 than existing industrialized building methods, including 3D printing,” said Lauren Vasey, one of the researchers and an SNSF Bridge Fellow at ETH Zurich.

How does impact printing work?

Excavated materials can’t be used directly for construction. So before beginning the impact printing process, researchers prepare a mix of Earth-based materials that has a balance of fine and coarse particles, ensuring both ease of use and structural strength. Fine materials like clay act as a binder, helping the particles stick together, while coarser materials like sand or gravel make the mix more stable and strong. This optimized mix is designed such that it can move easily through the robotic system without getting stuck or causing blockages.

“Impact printing” is a cement-free alternative to 3D-printed structures Read More »

stratasys-sues-bambu-lab-over-patents-used-widely-by-consumer-3d-printers

Stratasys sues Bambu Lab over patents used widely by consumer 3D printers

Patent protections pushed for proprietary processes —

Heated platforms and purge towers are among Stratasys’ infringement claims.

Bambu Lab A1, with three filament spools connected by circular loops off to the right.

Enlarge / The Bambu Lab A1, complete with heated build platform.

Bambu Lab

A patent lawsuit filed by one of 3D printing’s most established firms against a consumer-focused upstart could have a big impact on the wider 3D-printing scene.

In two complaints, (1, 2, PDF) filed in the Eastern District of Texas, Marshall Division, against six entities related to Bambu Lab, Stratasys alleges that Bambu Lab infringed upon 10 patents that it owns, some through subsidiaries like Makerbot (acquired in 2013). Among the patents cited are US9421713B2, “Additive manufacturing method for printing three-dimensional parts with purge towers,” and US9592660B2, “Heated build platform and system for three-dimensional printing methods.”

There are not many, if any, 3D printers sold to consumers that do not have a heated bed, which prevents the first layers of a model from cooling during printing and potentially shrinking and warping the model. “Purge towers” (or “prime towers” in Bambu’s parlance) allow for multicolor printing by providing a place for the filament remaining in a nozzle to be extracted and prevent bleed-over between colors. Stratasys’ infringement claims also target some fundamental technologies around force detection and fused deposition modeling (FDM) that, like purge towers, are used by other 3D-printer makers that target entry-level and intermediate 3D-printing enthusiasts.

Bambu Lab launched onto the 3D-printing scene in 2022, quickly picking up market share in the entry-level and enthusiast space, in part due to its relatively fast multicolor printing. It hasn’t had an entirely smooth path to its market share, with a cloud-based force printing fiasco in the summer of 2023 and a recall of its popular A1 printer for heat issues earlier this year.

Stratasys, by contrast, has been working in 3D printing since 1988, and its products are used more often in manufacturing and commercial prototyping. Its 3D printers were part of how General Motors pivoted to making face shields and ventilators during the COVID-19 pandemic. Its acquisition of MakerBot led to layoffs two years in and eventually a spin-off merger with Ultimaker, but Stratasys retained MakerBot’s patents.

Another patent lawsuit filed by a larger prototyping firm against a smaller semi-competitor was settled in 2014. 3D Systems sued Formlabs in 2012 over patents regarding laser-based stereolithography. That suit ended with Formlabs agreeing to pay an 8 percent royalty on all sales to 3D Systems. Stratasys had also previously sued another smaller-scale printing firm, Afinia, in 2013, although that case eventually failed.

Listing image by Bambu Lab

Stratasys sues Bambu Lab over patents used widely by consumer 3D printers Read More »

“rasti-computer”-is-a-detailed-grid-compass-tribute-made-from-framework-innards

“Rasti Computer” is a detailed GRiD Compass tribute made from Framework innards

But can it play Pitfall!? —

It’s a custom keyboard, an artfully dinged-up case, and a wonderful throwback.

Penk Chen's Rasti Computer

Enlarge / Penk Chen’s Rasti Computer, built with 3D printing, Framework laptop internals, and a deep love for the first laptop that went to space.

If I had to figure out what to do with the insides of a Framework 13 laptop I had lying around after today, I might not turn it into a strange but compelling “Slabtop” this time.

No, I think that, having seen Penk Chen’s remarkable project to fit Framework parts into a kind of modern restyling of the Grid Compass laptop, I would have to wait until Chen posts detailed build instructions for this project… and until I had a 3D printer… and could gather the custom mechanical keyboard parts. Sure, that’s a lot harder, but it’s hard to put a price on drawing unnecessary attention to yourself while you chonk away on your faux-used future laptop.

The Rasti Computer, which Chen writes is “derived from the German compound word ‘Rasterrahmen’ (grid + framework),” has at its core the mainboard, battery, and antennae from the highly modular and repairable first-generation Framework laptop. It takes input from the custom keyboard Chen designed for the chassis, with custom PCB and 3D-printed keycaps and case. It sends images to a 10.4-inch QLED 1600×720 display, and it all fits inside a bevy of 3D-printed pieces with some fairly standard hex-head bolts. Oh, and the hinges from a 2012 13-inch MacBook pro, though that’s possibly negotiable.

  • Rear view of the Rasti Computer, with “a touch of silver dry brushing [that] added the beat-up metal look.”

  • Semi-exploded view of the Rasti Computer.

  • You can, of course, run Windows on this device, if you like. But it might feel dissonant to put so much custom work in to run a stock OS.

Chen’s project derives from, and pays tribute to, the Grid Compass (styled “GRiD” by its maker, GRiD Systems Corp.). The Compass was probably (again, probably) the first clamshell-style laptop made. It saw use by NASA’s Space Shuttle program, as well as by military and other entities needing a laptop that was both compact and throw-it-at-a-wall durable. It had 256KB of memory by default (less than half the amount Bill Gates didn’t say you should ever need), a 320×240 pixel screen, and an Intel 8086 processor. Some models contained a 1,200bps modem. It cost more than $8,000 in 1982, or almost $25,000 today.

We have it on good word from some resident vintage computer collectors that the Compass remains a rare and expensive item to get. Rebuilding a Framework mainboard into a modern-day Grid-like doesn’t seem particularly cheap, depending on your 3D printer setup, or lack thereof. Nor is it likely to be easy, given a glimpse at how it goes together. But it will give you a unique portable and conversation piece, one that runs programs beyond Grid-OS.

You can read more about the Grid Compass at Cooper Hewitt, the firm where Compass designer Bill Moggridge worked as design director from 2010 until his 2011 passing. If you remember bubble memory, it’s a dip back into that genial trauma. Hackaday, where we first saw the Rasti project, wrote up a similarly Compass-inspired laptop, the GRIZ Sextant, with a Raspberry Pi at its core.

“Rasti Computer” is a detailed GRiD Compass tribute made from Framework innards Read More »