How to declutter, quiet down, and take the AI out of Windows 11 25H2
A new major Windows 11 release means a new guide for cleaning up the OS.

Credit: Aurich Lawson | Getty Images
Credit: Aurich Lawson | Getty Images
It’s that time of year again—temperatures are dropping, leaves are changing color, and Microsoft is gradually rolling out another major yearly update to Windows 11.
The Windows 11 25H2 update is relatively minor compared to last year’s 24H2 update (the “25” here is a reference to the year the update was released, while the “H2” denotes that it was released in the second half of the year, a vestigial suffix from when Microsoft would release two major Windows updates per year). The 24H2 update came with some major under-the-hood overhauls of core Windows components and significant performance improvements for the Arm version; 25H2 is largely 24H2, but with a rolled-over version number to keep it in line with Microsoft’s timeline for security updates and tech support.
But Microsoft’s continuous update cadence for Windows 11 means that even the 24H2 version as it currently exists isn’t the same one Microsoft released a year ago.
To keep things current, we’ve combed through our Windows cleanup guide, updating it for the current build of Windows 11 25H2 (26200.7019) to help anyone who needs a fresh Windows install or who is finally updating from Windows 10 now that Microsoft is winding down support for it. We’ll outline dozens of individual steps you can take to clean up a “clean install” of Windows 11, which has taken an especially user-hostile attitude toward advertising and forcing the use of other Microsoft products.
As before, this is not a guide about creating an extremely stripped-down, telemetry-free version of Windows; we stick to the things that Microsoft officially supports turning off and removing. There are plenty of experimental hacks and scripts that take it a few steps farther, and/or automate some of the steps we outline here—NTDev’s Tiny11 project is one—but removing built-in Windows components can cause unexpected compatibility and security problems, and Tiny11 has historically had issues with basic table-stakes stuff like “installing security updates.”
These guides capture moments in time, and regular monthly Windows patches, app updates downloaded through the Microsoft Store, and other factors all can and will cause small variations from our directions. You may also see apps or drivers specific to your PC’s manufacturer. This guide also doesn’t cover the additional bloatware that may come out of the box with a new PC, starting instead with a freshly installed copy of Windows from a USB drive.
Table of Contents
Starting with Setup: Avoiding Microsoft account sign-in
The most contentious part of Windows 11’s setup process relative to earlier Windows versions is that it mandates a Microsoft account sign-in, with none of the readily apparent “limited account” fallbacks that existed in Windows 10. As of Windows 11 22H2, that’s true of both the Home and Pro editions.
There are two reasons I can think of not to sign in with a Microsoft account. The first is that you want nothing to do with a Microsoft account, thank you very much. Signing in makes Windows bombard you with more Microsoft 365, OneDrive, and Game Pass subscription upsells since all you need to do is add them to an account that already exists, and Windows setup will offer subscriptions to each if you sign in first.
The second—which describes my situation—is that you do use a Microsoft account because it offers some handy benefits like automated encryption of your local drive (having those encryption keys tied to my account has saved me a couple of times) or syncing of browser info and some preferences. But you don’t want to sign in at setup, either because you don’t want to be bothered with the extra upsells or you prefer your user folder to be located at “C:UsersAndrew” rather than “C:Users.”
Regardless of your reasoning, if you don’t want to bother with sign-in at setup, you have a few different options:
Use the command line
During Windows 11 Setup, after selecting a language and keyboard layout but before connecting to a network, hit Shift+F10 to open the command prompt (depending on your keyboard, you may also need to hit the Fn key before pressing F10). Type OOBEBYPASSNRO, hit Enter, and wait for the PC to reboot.
When it comes back, click “I don’t have Internet” on the network setup screen, and you’ll have recovered the option to use “limited setup” (aka a local account) again, like older versions of Windows 10 and 11 offered.
This option has been removed from some Windows 11 testing builds, but it still works as of this writing in 25H2. We may see this option removed in a future update to Windows.
For Windows 11 Pro
For Windows 11 Pro users, there’s a command-line-free workaround you can take advantage of.
Proceed through the Windows 11 setup as you normally would, including connecting to a network and allowing the system to check for updates. Eventually, you’ll be asked whether you’re setting your PC up for personal use or for “work or school.”
Select the “work or school” option, then “sign-in options,” at which point you’ll finally be given a button that says “domain join instead.” Click this to indicate you’re planning to join the PC to a corporate domain (even though you aren’t), and you’ll see the normal workflow for creating a “limited” local account.
The downside is that you’re starting your relationship with your new Windows install by lying to it. But hey, if you’re using the AI features, your computer is probably going to lie to you, too. It all balances out.
Using the Rufus tool
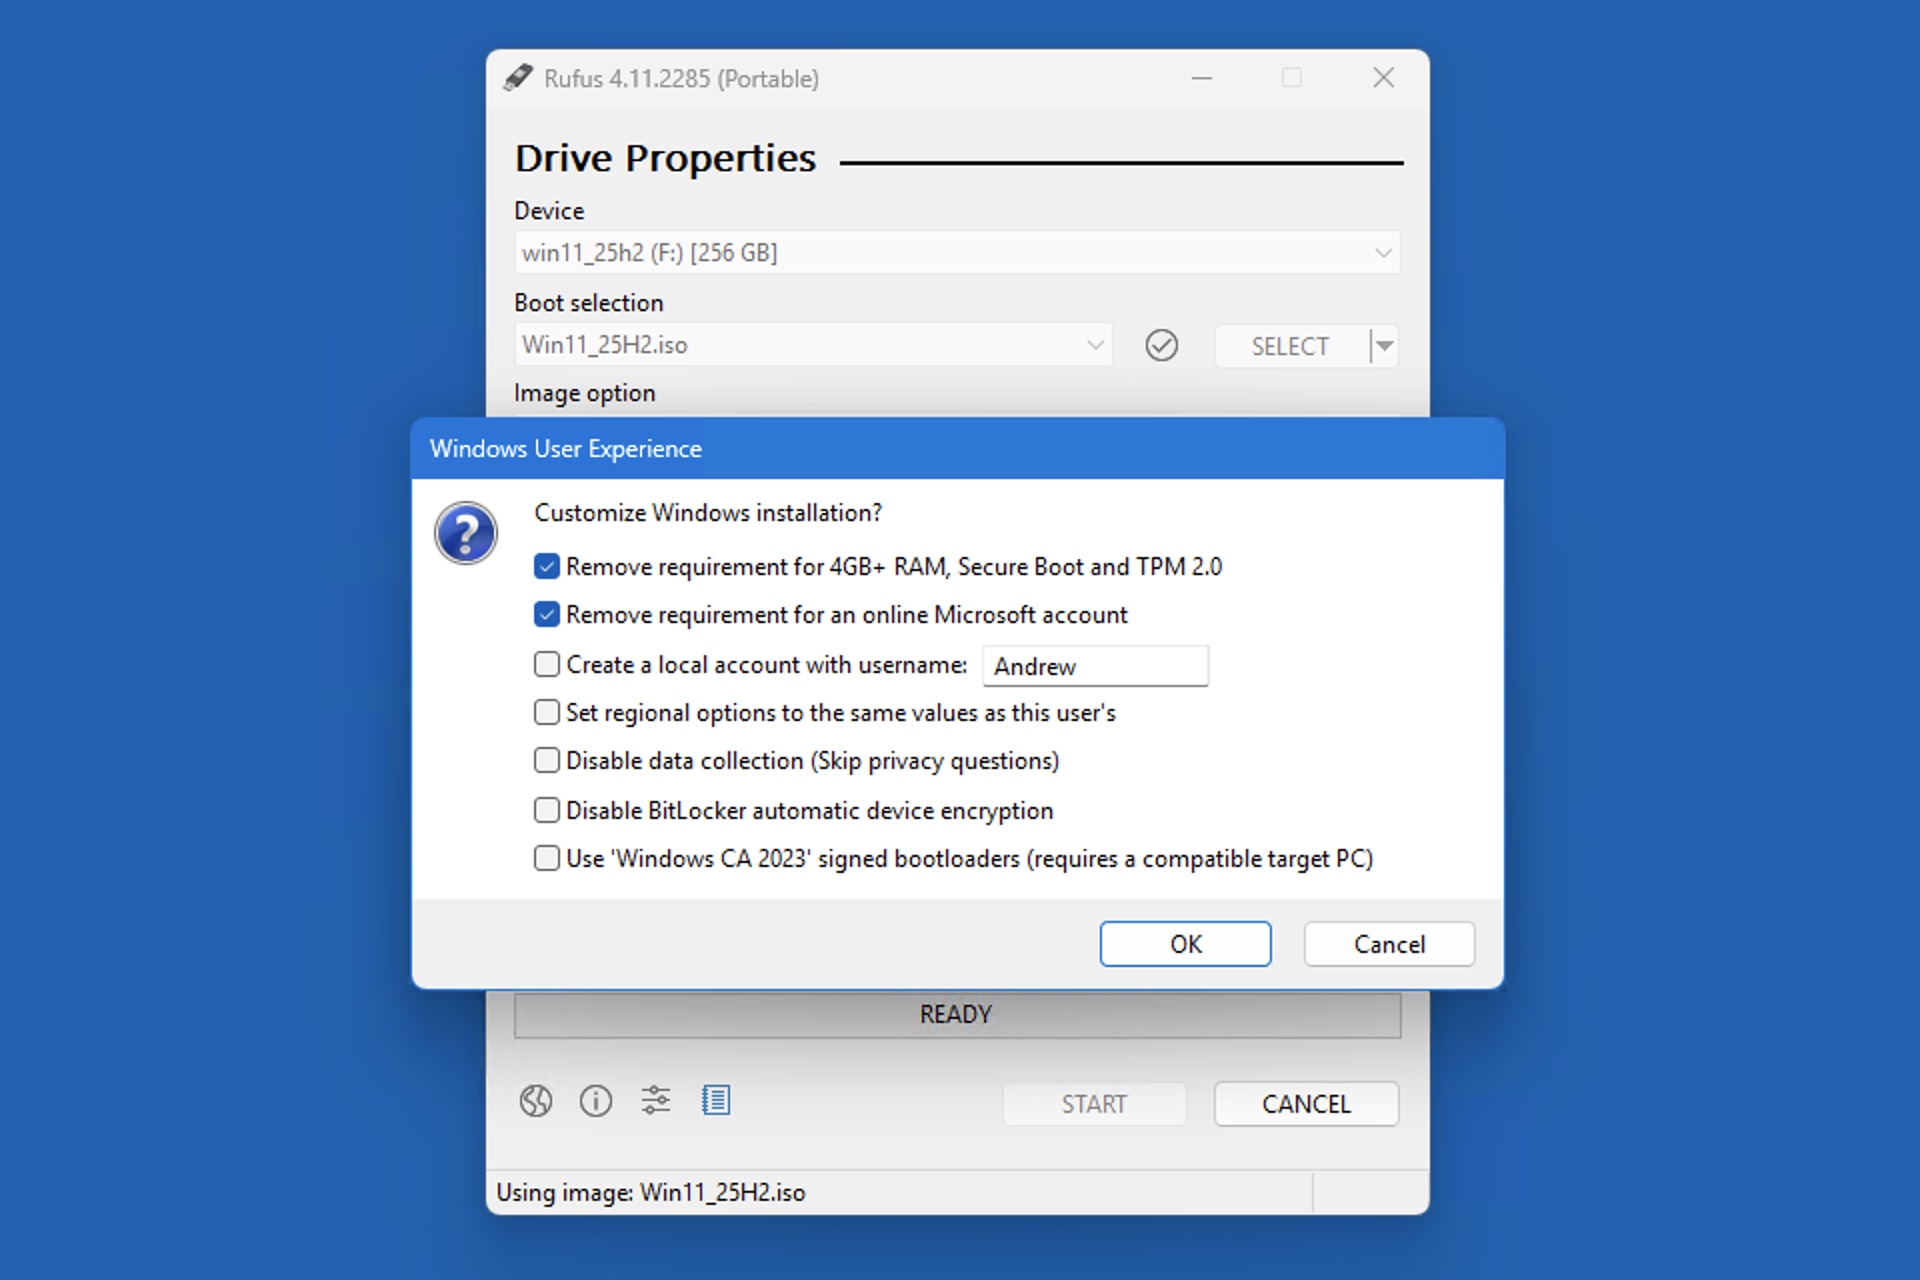
Credit: Andrew Cunningham
The Rufus tool can streamline a few of the more popular tweaks and workarounds for Windows 11 install media. Rufus is a venerable open source app for creating bootable USB media for both Windows and Linux. If you find yourself doing a lot of Windows 11 installs and don’t want to deal with Microsoft accounts, Rufus lets you tweak the install media itself so that the “limited setup” options always appear, no matter which edition of Windows you’re using.
To start, grab Rufus and then a fresh Windows 11 ISO file from Microsoft. You’ll also want an 8GB or larger USB drive; I’d recommend a 16GB or larger drive that supports USB 3.0 speeds, both to make things go a little faster and to leave yourself extra room for drivers, app installers, and anything else you might want to set a new PC up for the first time. (I also like this SanDisk drive that has a USB-C connector on one end and a USB-A connector on the other to ensure compatibility with all kinds of PCs.)
Fire up Rufus, select your USB drive and the Windows ISO, and hit Start to copy over all of the Windows files. After you hit Start, you’ll be asked if you want to disable some system requirements checks, remove the Microsoft account requirement, or turn off all the data collection settings that Windows asks you about the first time you set it up. What you do here is up to you; I usually turn off the sign-in requirement, but disabling the Secure Boot and TPM checks doesn’t stop those features from working once Windows is installed and running.
The rest of Windows 11 setup
The main thing I do here, other than declining any and all Microsoft 365 or Game Pass offers, is turn all the toggles on the privacy settings screen to “no.” This covers location services, the Find My Device feature, and four toggles that collectively send a small pile of usage and browsing data to Microsoft that it uses “to enhance your Microsoft experiences.” Pro tip: Use the Tab key and spacebar to quickly toggle these without clicking or scrolling.
Of these, I can imagine enabling Find My Device if you’re worried about theft or location services if you want Windows and apps to be able to access your location. But I tend not to send any extra telemetry or browsing data other than the basics (the only exception being on machines I enroll in the Windows Insider Preview program for testing, since Microsoft requires you to send more detailed usage data from those machines to help it test its beta software). If you want to change any of these settings after setup, they’re all in the Settings app under Privacy & Security.
If you have signed in with a Microsoft account during setup, you can expect to see several additional setup screens that aren’t offered when you’re signing in with a local account, including attempts to sell Microsoft 365, OneDrive, and Xbox Game Pass subscriptions. Accept or decline these offers as desired.
Cleaning up Windows 11
Reboot once this is done, and you’ll be at the Windows desktop. Start by installing any drivers you need, plus Windows updates.
When you first connect to the Internet, Windows may or may not decide to automatically pull down a few extraneous third-party apps and app shortcuts, things like Spotify or Grammarly—this has happened to me consistently in most Windows 11 installs I’ve done over the years, though it hasn’t generally happened on the 24H2 and 25H2 PCs I’ve set up.
Open the Start menu and right-click each of the apps you don’t want to remove the icons for and/or uninstall. Some of these third-party apps are just stubs that won’t actually be installed to your computer until you try to run them, so removing them directly from the Start menu will get rid of them entirely.
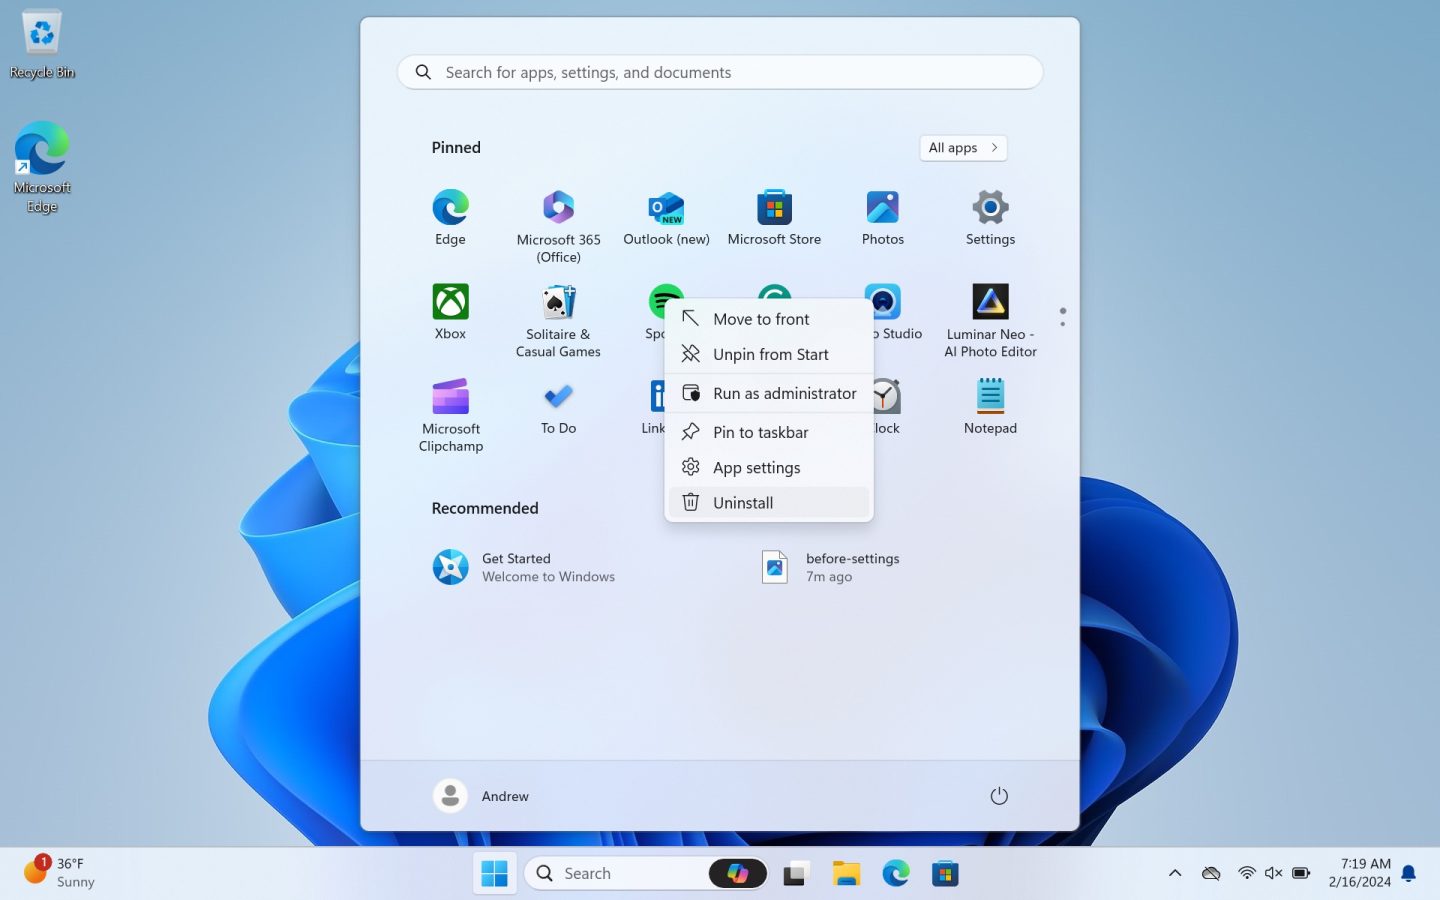
Right-clicking and uninstalling the unwanted apps that are pinned to the Start menu is the fastest (and, for some, the only) way to get rid of them.
Credit: Andrew Cunningham
Right-clicking and uninstalling the unwanted apps that are pinned to the Start menu is the fastest (and, for some, the only) way to get rid of them. Credit: Andrew Cunningham
The other apps and services included in a fresh Windows install generally at least have the excuse of being first-party software, though their usefulness will be highly user-specific: Xbox, the new Outlook app, Clipchamp, and LinkedIn are the ones that stand out, plus the ad-driven free-to-play version of the Solitaire suite that replaced the simple built-in version during the Windows 8 era.
Rather than tell you what I remove, I’ll tell you everything that can be removed from the Installed Apps section of the Settings app (also quickly accessible by right-clicking the Start button in the taskbar). You can make your own decisions here; I generally leave the in-box versions of classic Windows apps like Sound Recorder and Calculator while removing things I don’t use, like To Do or Clipchamp.
This list should be current for a fresh, fully updated install of Windows 11 25H2, at least in the US, but it doesn’t include any apps that might be specific to your hardware, like audio or GPU settings apps. Some individual apps may or may not appear as part of your Windows install.
- Calculator
- Camera
- Clock (may also appear as Windows Clock)
- Copilot
- Family
- Feedback Hub
- Game Assist
- Media Player
- Microsoft 365 Copilot
- Microsoft Clipchamp
- Microsoft OneDrive: Removing this, if you don’t use it, should also get rid of notifications about OneDrive and turning on Windows Backup.
- Microsoft Teams
- Microsoft To Do
- News
- Notepad
- Outlook for Windows
- Paint
- Photos
- Power Automate
- Quick Assist
- Remote Desktop Connection
- Snipping Tool
- Solitaire & Casual Games
- Sound Recorder
- Sticky Notes
- Terminal
- Weather
- Web Media Extensions
- Xbox
- Xbox Live
In Windows 11 23H2, Microsoft moved almost all of Windows’ non-removable apps to a System Components section, where they can be configured but not removed; this is where things like Phone Link, the Microsoft Store, Dev Home, and the Game Bar have ended up. The exception is Edge and its associated updater and WebView components; these are not removable, but they aren’t listed as “system components” for some reason, either.
Start, Search, Taskbar, and lock screen decluttering
Microsoft has been on a yearslong crusade against unused space in the Start menu and taskbar, which means there’s plenty here to turn off.
- Right-click an empty space on the desktop, click Personalize, and click any of the other built-in Windows themes to turn off the Windows Spotlight dynamic wallpapers and the “Learn about this picture” icon.
- Right-click the Taskbar and click Taskbar settings. I usually disable the Widgets board; you can leave this if you want to keep the little local weather icon in the lower-left corner of your screen, but this space is also sometimes used to present junky news articles from the Microsoft Start service.
- If you want to keep Widgets enabled but clean it up a bit, open the Widgets menu, click the Settings gear in the top-right corner, scroll to “Show or hide feeds,” and turn the feed off. This will keep the weather, local sports scores, stocks, and a few other widgets, but it will get rid of the spammy news articles.
- Also in the Taskbar settings, I usually change the Search field to “search icon only” to get rid of the picture in the search field and reduce the amount of space it takes up. Toggle the different settings until you find one you like.
- Open Settings > Privacy & Security > Recommendations & offers and disable “Personalized offers,” “Improve Start and search results,” “Show notifications in Settings,” “Recommendations and offers in Settings,” and “Advertising ID” (some of these may already be turned off). These settings mostly either send data to Microsoft or clutter up the Settings app with various recommendations and ads.
- Open Settings > Privacy & Security > Diagnostics & feedback, scroll down to “Feedback frequency,” and select “Never” to turn off all notifications requesting feedback about various Windows features.
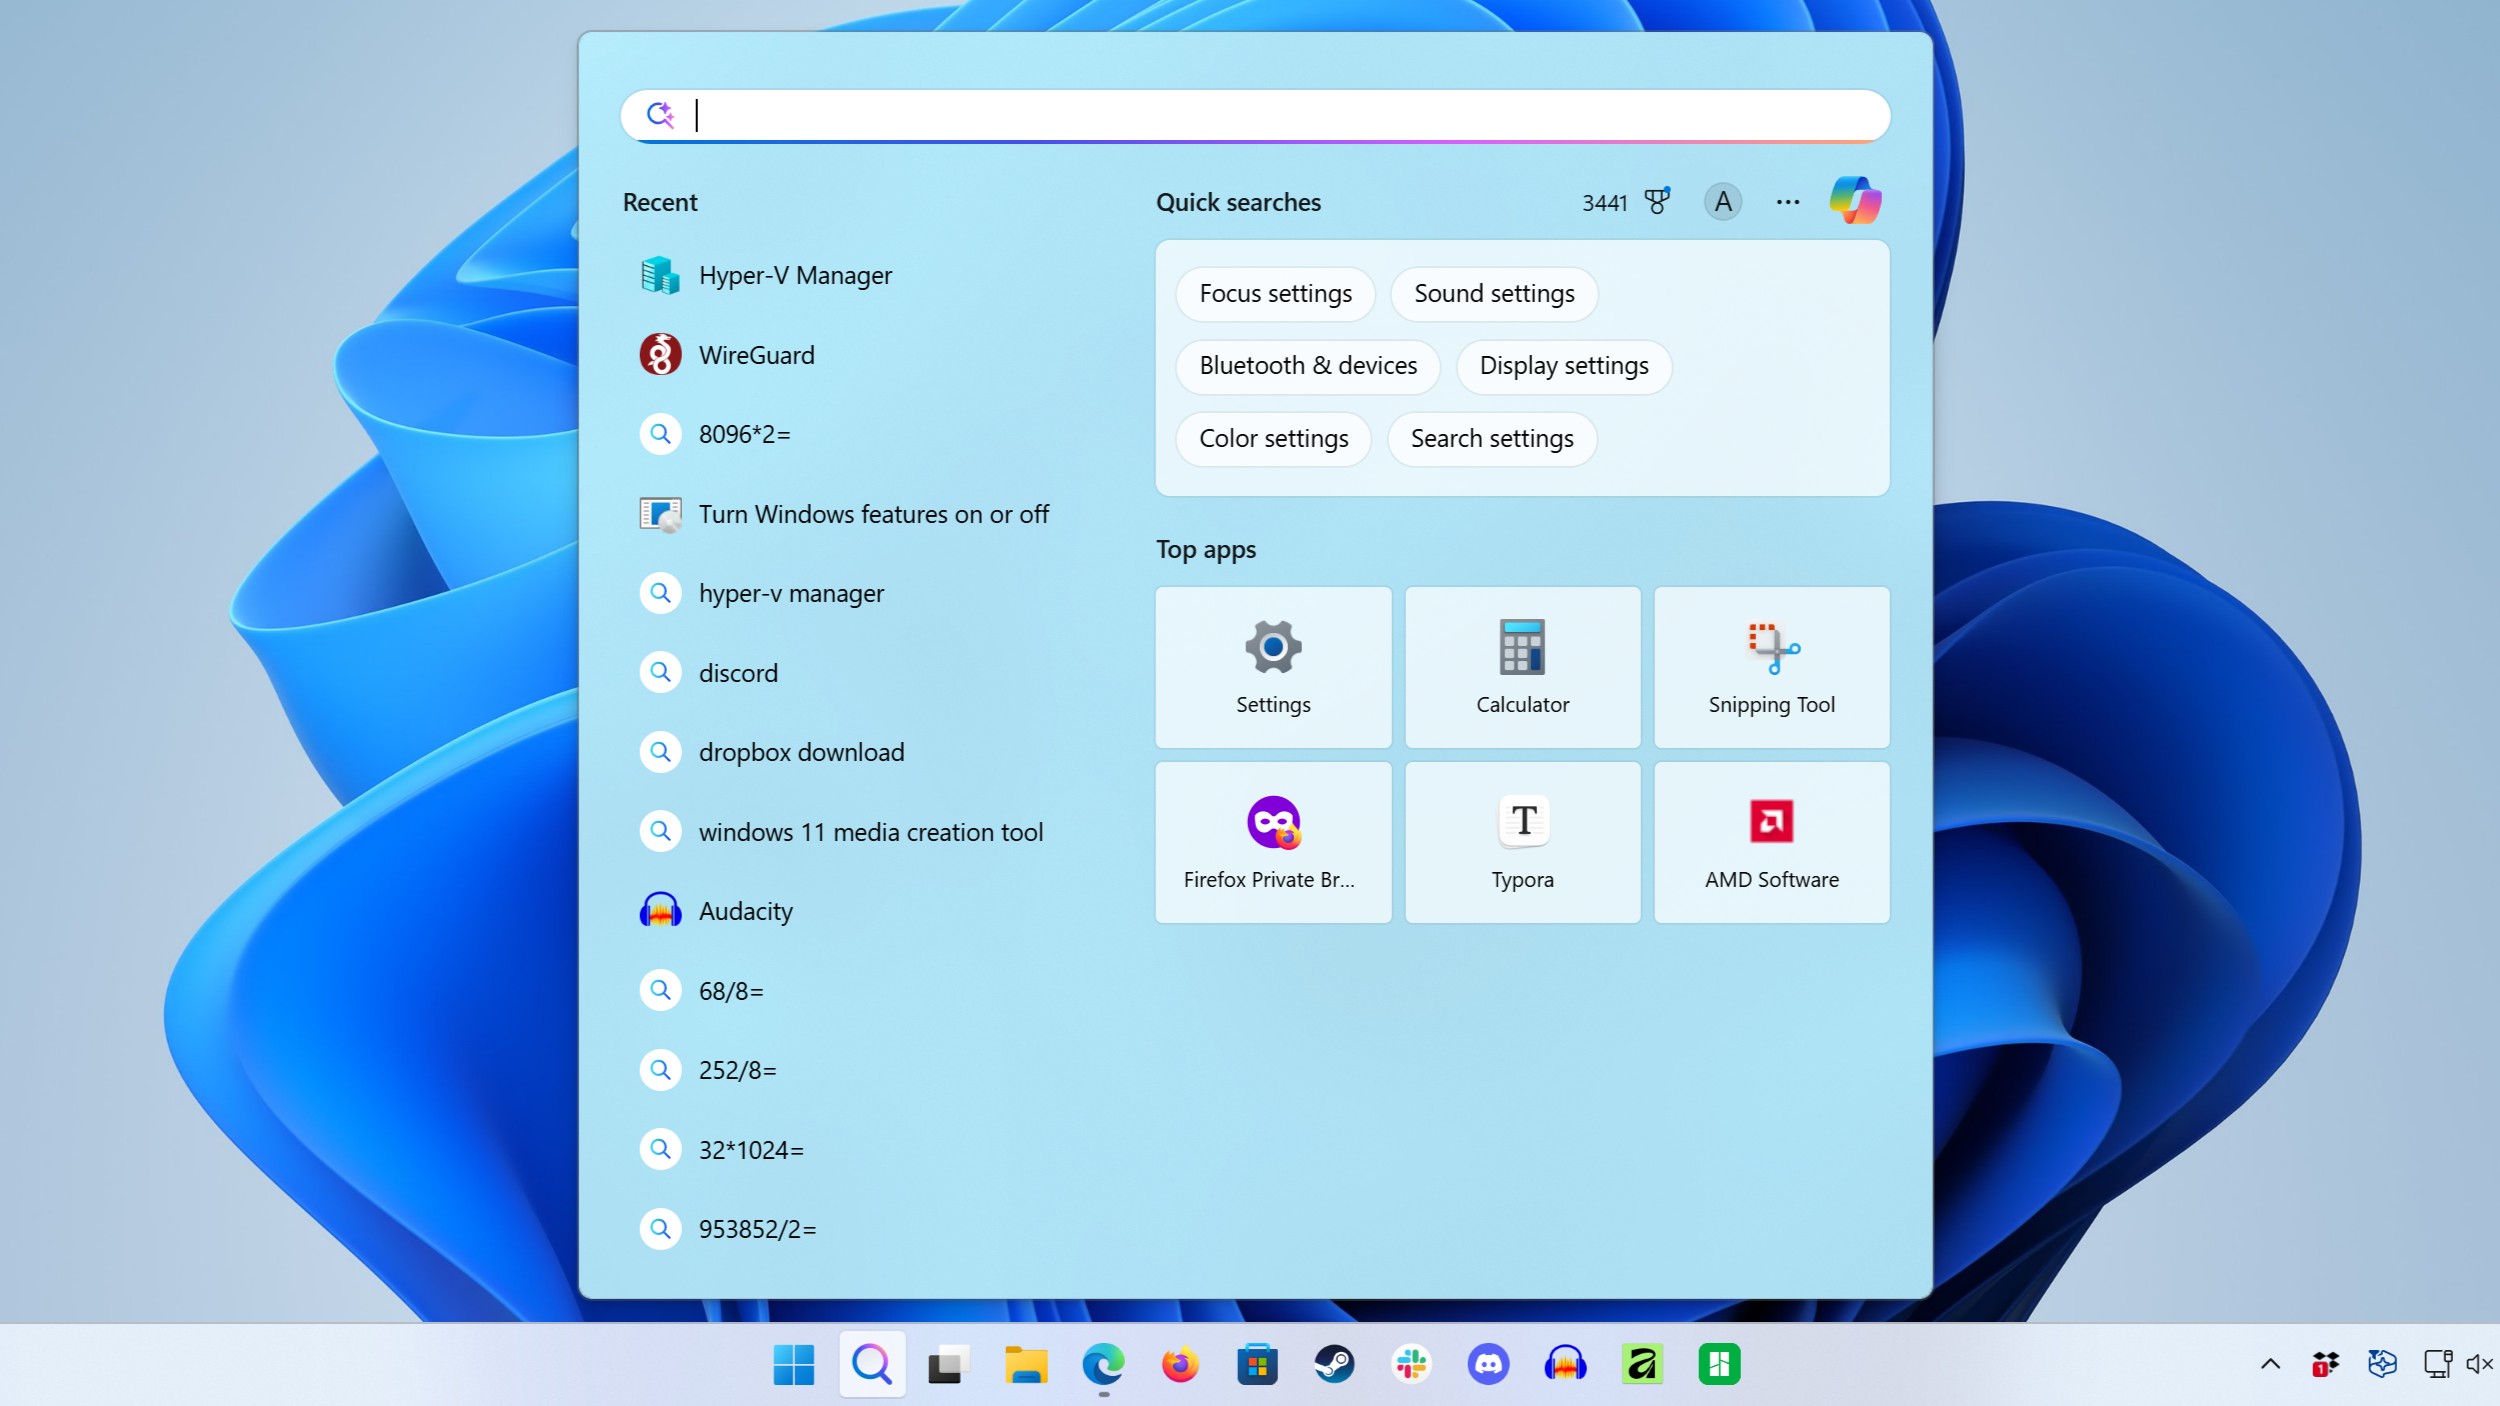
- Open Settings > Privacy & Security, click Search and disable “Show search highlights.” This cleans up the Search menu quite a bit, focusing it on searches you’ve done yourself and locally installed apps.
- Open Settings > Personalization > Lock screen. Under “Personalize your lock screen,” switch from “Windows spotlight” to either Picture or Slideshow to use local images for your lock screen, and then uncheck the “get fun facts, tips, tricks, and more” box that appears. This will hide the other text boxes and clickable elements that Windows automatically adds to the lock screen in Spotlight mode. Under “Lock screen status,” select “none” to hide the weather widget and other stocks and news widgets from your lock screen.
- If you own a newer Windows PC with a dedicated Copilot key, you can navigate to Settings > Personalization > Text input and scroll down to remap the key. Unfortunately, its usefulness is still limited—you can reassign it to the Search function or to the built-in Microsoft 365 app, but by default, Windows doesn’t give you the option to reassign it to open any old app.
Credit: Andrew Cunningham
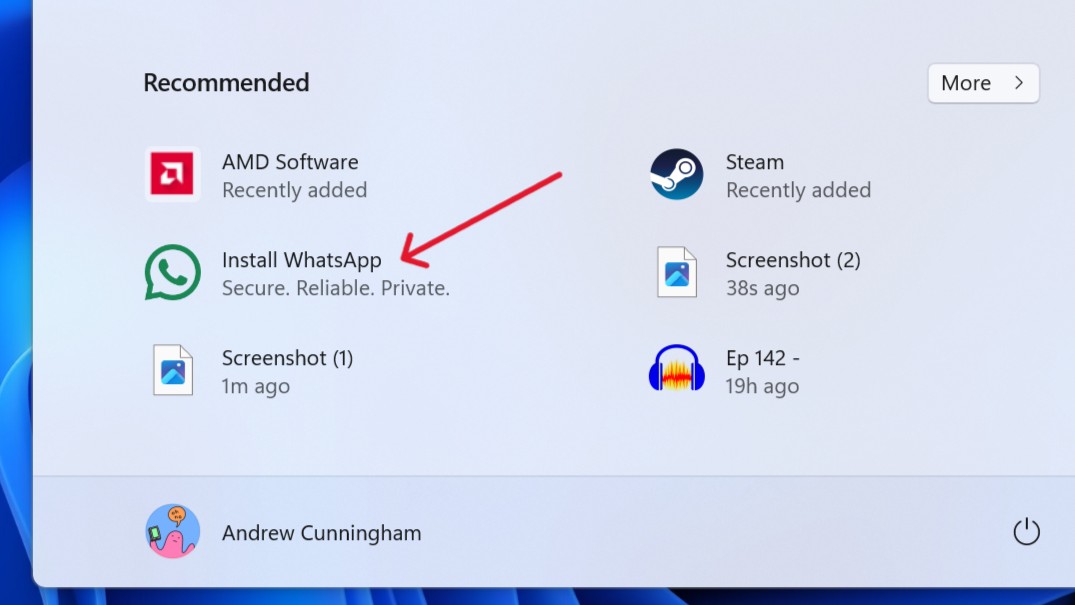
By default, the Start menu will occasionally make “helpful” suggestions about third-party Microsoft Store apps to grab. These can and should be turned off.
- Open Settings > Personalization > Start. Turn off “Show recommendations for tips, shortcuts, new apps, and more.” This will disable a feature where Microsoft Store apps you haven’t installed can show up in Recommendations along with your other files. You can also decide whether you want to be able to see more pinned apps or more recent/recommended apps and files on the Start menu, depending on what you find more useful.
- On the same page, disable “show account-related notifications” to reduce the number of reminders and upsell notifications you see related to your Microsoft account.
Credit: Andrew Cunningham
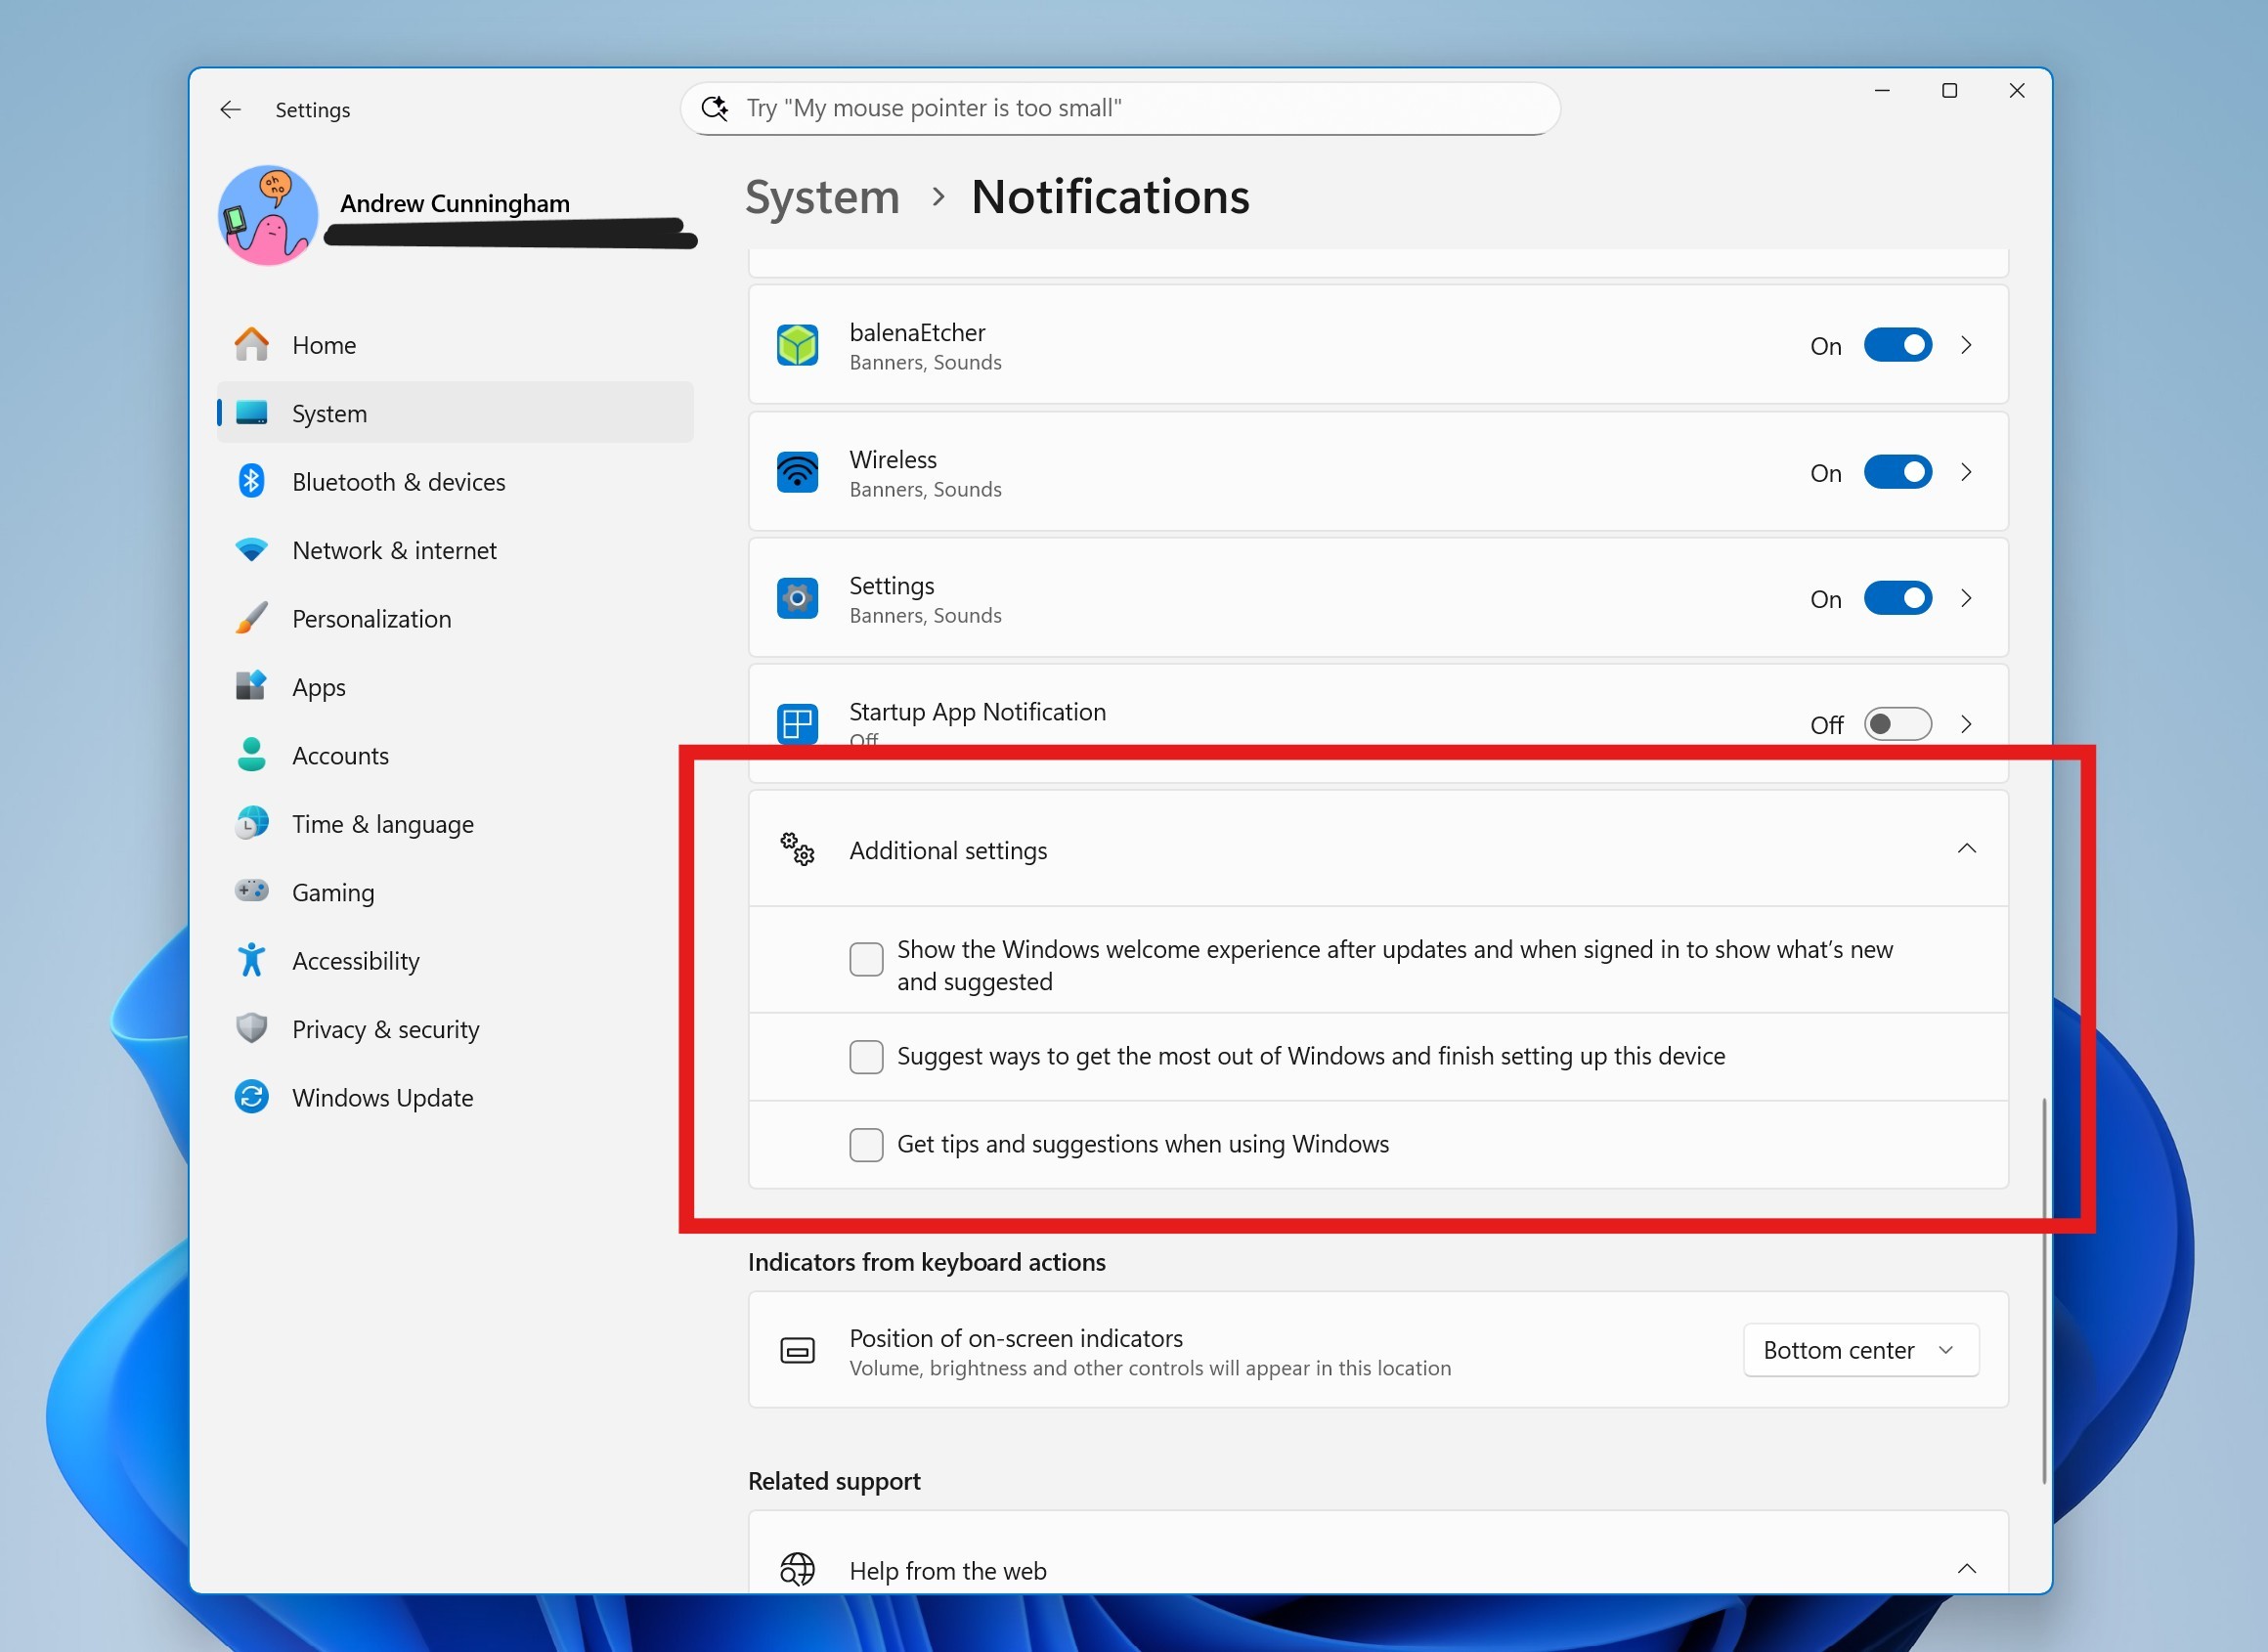
- Open Settings > System > Notifications, scroll down, and expand the additional settings section. Uncheck all three boxes here, which should get rid of all the “finish setting up your PC” prompts, among other things.
- Also feel free to disable notifications from any specific apps you don’t want to hear from.
In-app AI features
Microsoft has steadily been adding image and text generation capabilities to some of the bedrock in-box Windows apps, from Paint and Photos to Notepad.
Exactly which AI features you’re offered will depend on whether you’ve signed in with a Microsoft account or not or whether you’re using a Copilot+ PC with access to more AI features that are executed locally on your PC rather than in the cloud (more on those in a minute).
But the short version is that it’s usually not possible to turn off or remove these AI features without uninstalling the entire app. Apps like Notepad and Edge do have toggles for shutting off Copilot and other related features, but no such toggles exist in Paint, for example.
Even if you can find some Registry key or another backdoor way to shut these things off, there’s no guarantee the settings will stick as these apps are updated; it’s probably easier to just try to ignore any AI features within these apps that you don’t plan to use.
Removing Recall, and other extra steps for Copilot+ PCs
So far, everything we’ve covered has been applicable to any PC that can run Windows 11. But new PCs with the Copilot+ branding—anything with a Qualcomm Snapdragon X chip in it or things with certain Intel Core Ultra or AMD Ryzen AI CPUs—get extra features that other Windows 11 PCs don’t have. Given that these are their own unique subclass of PCs, it’s worth exploring what’s included and what can be turned off.
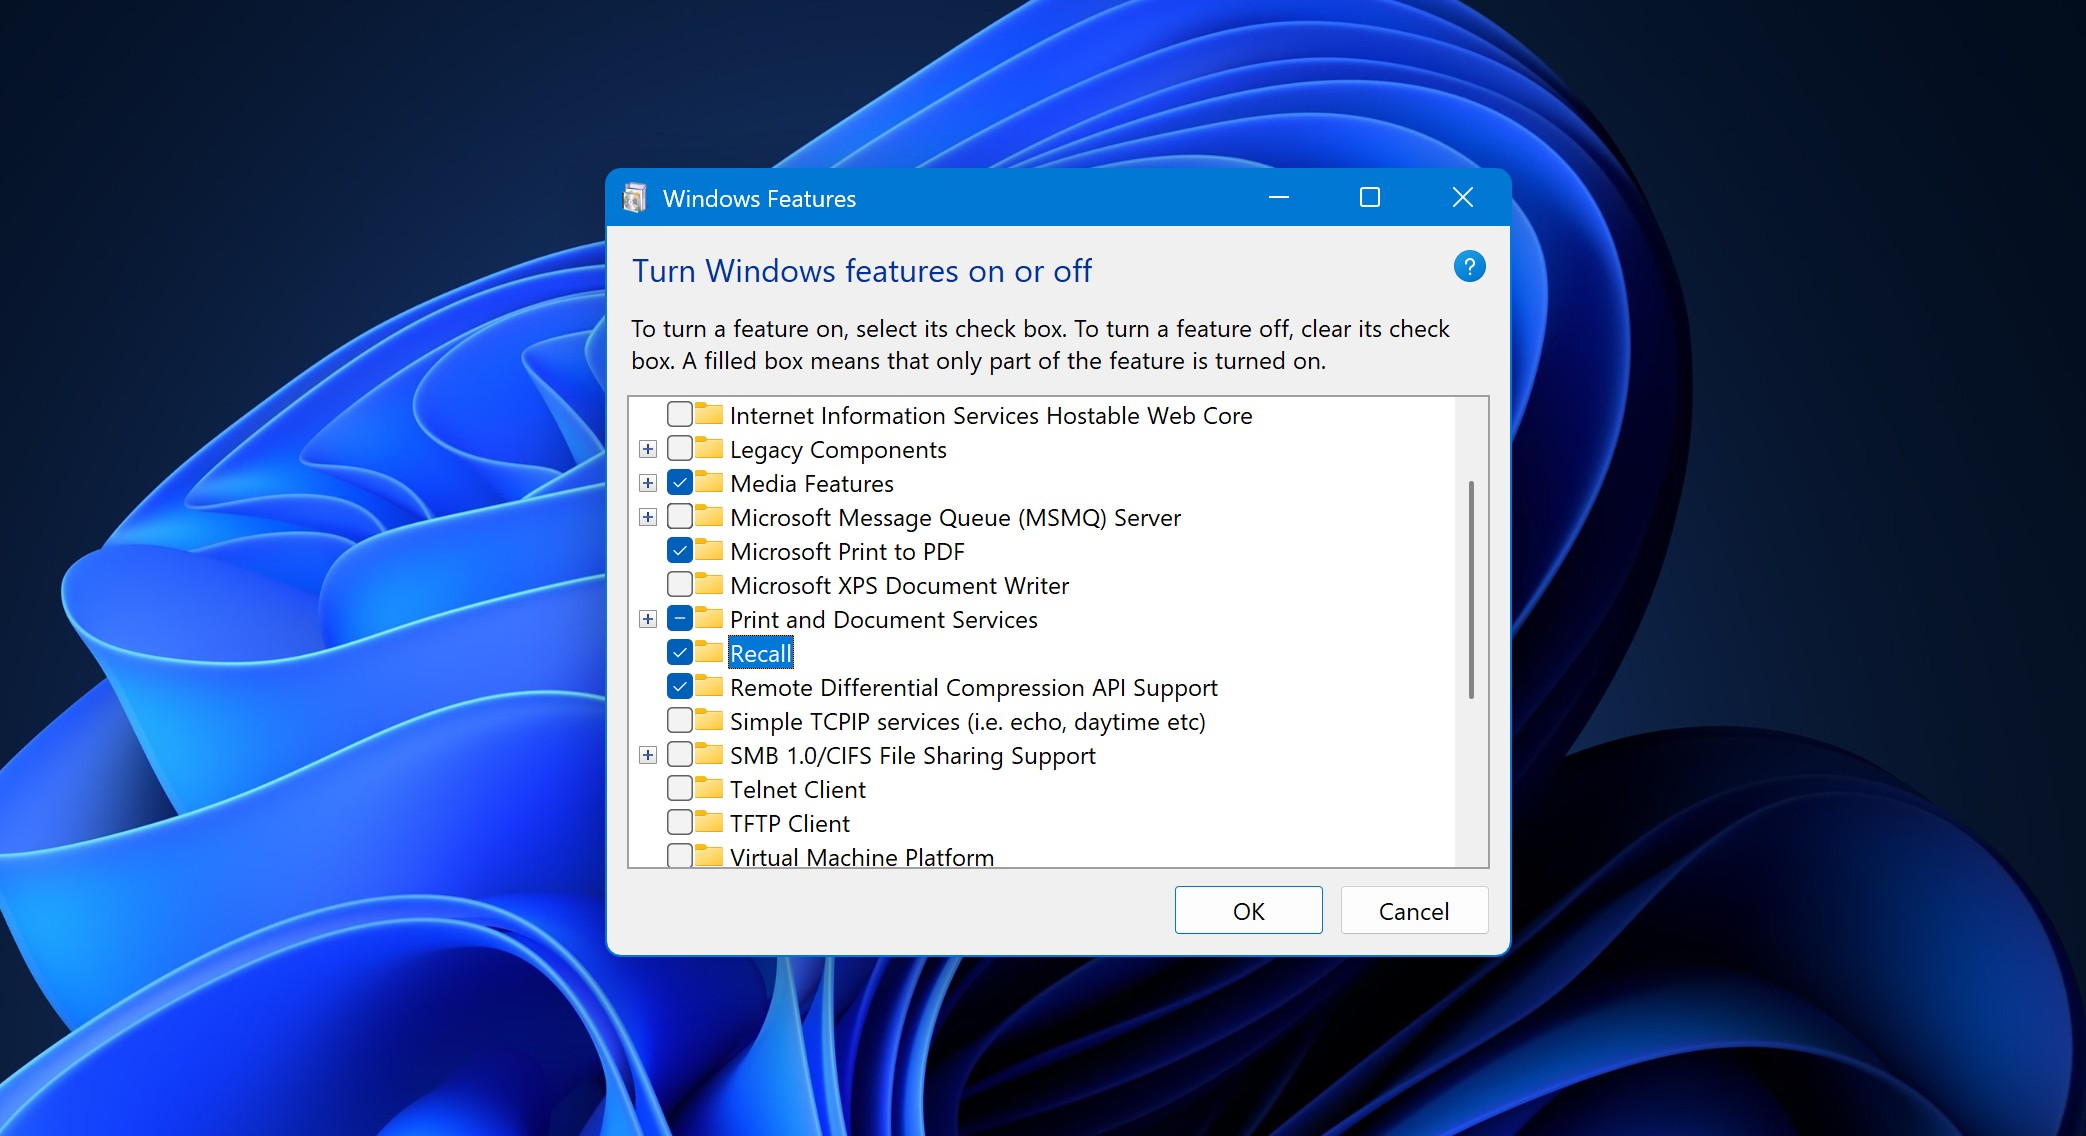
Removing Recall will be possible, though it’s done through a relatively obscure legacy UI rather than the Settings app. Credit: Andrew Cunningham
One Copilot+ feature that can be fully removed, in part because of the backlash it initially caused, is the data-scraping Recall feature. Recall won’t be enabled on your Copilot+ system unless you’re signed in with a Microsoft account and you explicitly opt in. But if fully removing the feature gives you extra peace of mind, then by all means, remove it.
- If you just want to make sure Recall isn’t active, navigate to Settings > Privacy & security > Recall & snapshots. This is where you adjust Recall’s settings and verify whether it’s turned on or off.
- To fully remove Recall, open Settings > System > Optional Features, scroll down to the bottom of this screen, and click More Windows features. This will open the old “Turn Windows features on or off” Control Panel applet used to turn on or remove some legacy or power-user-centric components, like old versions of the .NET Framework or Hyper-V. It’s arranged alphabetically.
- In Settings > Privacy & security > Click to Do, you’ll also find a toggle to disable Click to Do, a Copilot+ feature that takes a screenshot of your desktop and tries to make recommendations or suggest actions you might perform (copying and pasting text or an image, for example).
Apps like Paint or Photos may also prompt you to install an extension for AI-powered image generation from the Microsoft Store. This extension—which weighs in at well over a gigabyte as of this writing—is not installed by default. If you have installed it, you can remove it by opening Settings > Apps > Installed apps and removing “ImageCreationHostApp.”
Bonus: Cleaning up Microsoft Edge
I use Edge out of pragmatism rather than love—”the speed, compatibility, and extensions ecosystem of Chrome, backed by the resources of a large company that isn’t Google” is still a decent pitch. But Edge has become steadily less appealing as Microsoft has begun pushing its own services more aggressively and stuffing the browser with AI features. In a vacuum, Firefox aligns better with what I want from a browser, but it just doesn’t respond well to my normal tab-monster habits despite several earnest attempts to switch—things bog down and RAM runs out. I’ve also had mixed experience with the less-prominent Chromium clones, like Opera, Vivaldi, and Brave. So Edge it is, at least for now.
The main problem with Edge on a new install of Windows is that even more than Windows, it exists in a universe where no one would ever want to switch search engines or shut off any of Microsoft’s “value-added features” except by accident. Case in point: Signing in with a Microsoft account will happily sync your bookmarks, extensions, and many kinds of personal data. But many settings for search engine changes or for opting out of Microsoft services do not sync between systems and require a fresh setup each time.
Below are the Edge settings I change to maximize the browser’s usefulness (and usable screen space) while minimizing annoying distractions; it involves turning off most of the stuff Microsoft has added to the Chromium version of Edge since it entered public preview many years ago. Here’s a list of things to tweak, whether you sign in with a Microsoft account or not.
- On the Start page when you first open the browser, hit the Settings gear in the upper-right corner. Turn off “Quick links” (or if you leave them on, turn off “Show sponsored links”) and then turn off “show content.” Whether you leave the custom background or the weather widget is up to you.
- Click the “your privacy choices” link at the bottom of the menu and turn off the “share my data with third parties for personalized ads” toggle.
Edge has scattered some of the settings we change over the last year, but the browser is still full of toggles we prefer to keep turned off. Andrew Cunningham
- In the Edge UI, click the ellipsis icon near the upper-right corner of the screen and click Settings.
- Click Profiles in the left Settings sidebar. Click Microsoft Rewards, and then turn it off.
- Click Privacy, Search, & Services in the Settings sidebar.
- In Tracking prevention, I set tracking prevention to “strict,” though if you use some other kind of content blocker, this may be redundant; it can also occasionally prompt “it looks like you’re using an ad-blocker” pop-up from sites even if you aren’t.
- In Privacy, if they’re enabled, disable the toggles under “Optional diagnostic data,” “Help improve Microsoft products,” and “Allow Microsoft to save your browsing activity.”
- In Search and connected experiences, disable the “Suggest similar sites when a website can’t be found,” “Save time and money with Shopping in Microsoft Edge,” and “Organize your tabs” toggles.
- If you want to switch from Bing, click “Address bar and search” and switch to your preferred engine, whether that’s Google, DuckDuckGo, or something else. Then click “Search suggestions and filters” and disable “Show me search and site suggestions using my typed characters.”
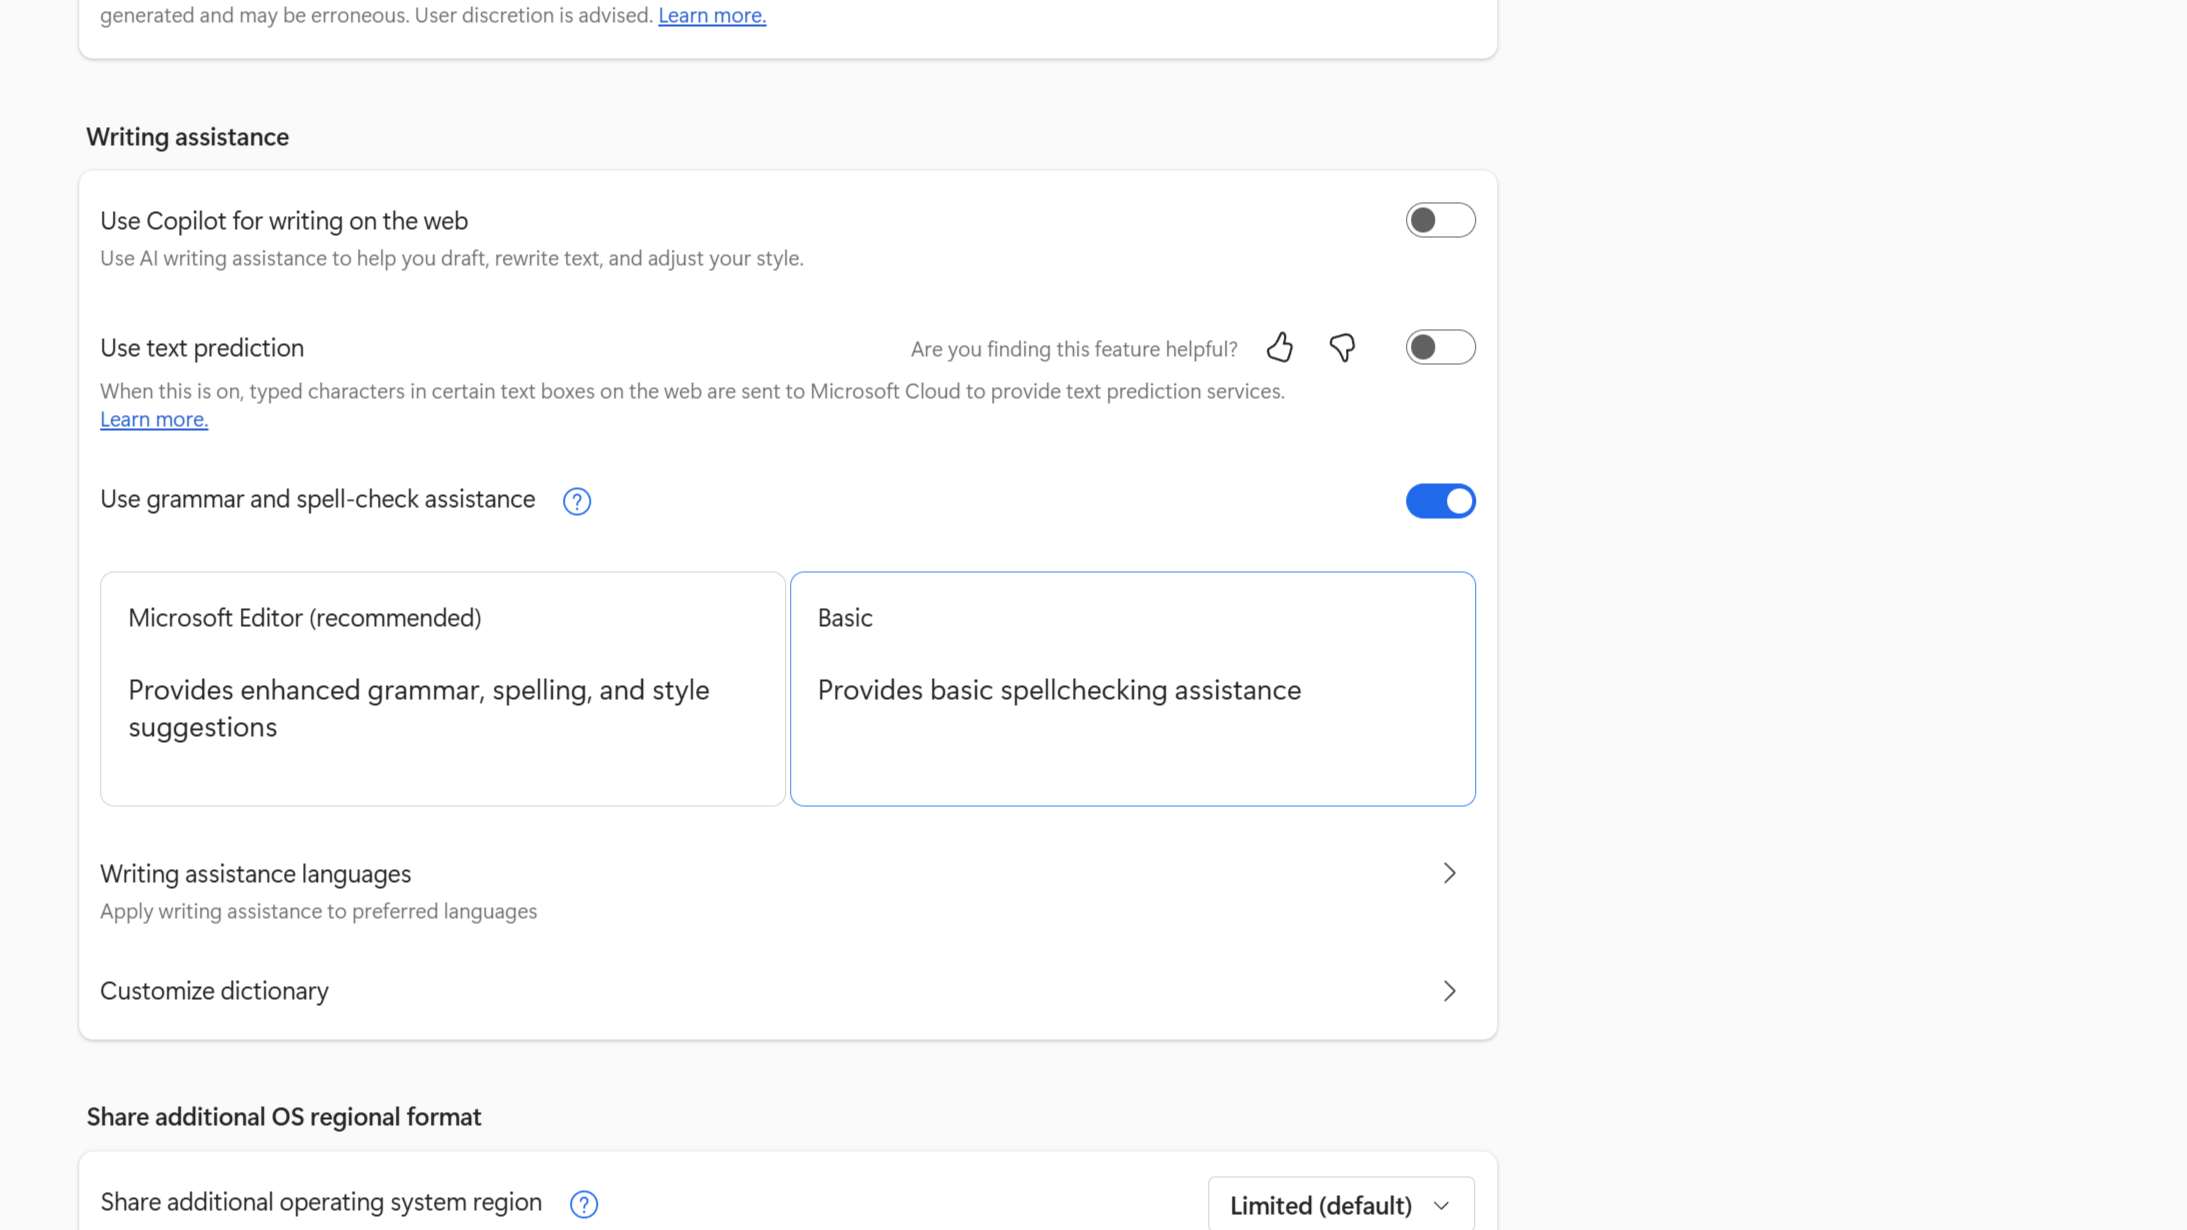
These settings retain basic spellcheck without any of the AI-related additions. Credit: Andrew Cunningham
- Click Appearance in the left-hand Settings sidebar, and scroll down to Copilot and sidebar
- Turn the sidebar off, and turn off the “Personalize my top sites in customize sidebar” and “Allow sidebar apps to show notifications” toggles.
- Click Copilot under App specific settings. Turn off “Show Copilot button on the toolbar.” Then, back in the Copilot and sidebar settings, turn off the “Show sidebar button” toggle that has just appeared.
- Click Languages in the left-hand navigation. Disable “Use Copilot for writing on the web.” Turn off “use text prediction” if you want to prevent things you type from being sent to Microsoft, and switch the spellchecker from Microsoft Editor to Basic. (I don’t actually mind Microsoft Editor, but it’s worth remembering if you’re trying to minimize the amount of data Edge sends back to the company.)
Windows-as-a-nuisance
The most time-consuming part of installing a fresh, direct-from-Microsoft copy of Windows XP or Windows 7 was usually reinstalling all the apps you wanted to run on your PC, from your preferred browser to Office, Adobe Reader, Photoshop, and the VLC player. You still need to do all of that in a new Windows 11 installation. But now more than ever, most people will want to go through the OS and turn off a bunch of stuff to make the day-to-day experience of using the operating system less annoying.
That’s more relevant now that Microsoft has formally ended support for Windows 10. Yes, Windows 10 users can get an extra year of security updates relatively easily, but many who have been putting off the Windows 11 upgrade will be taking the plunge this year.
The settings changes we’ve recommended here may not fix everything, but they can at least give you some peace, shoving Microsoft into the background and allowing you to do what you want with your PC without as much hassle. Ideally, Microsoft would insist on respectful, user-friendly defaults itself. But until that happens, these changes are the best you can do.

Andrew is a Senior Technology Reporter at Ars Technica, with a focus on consumer tech including computer hardware and in-depth reviews of operating systems like Windows and macOS. Andrew lives in Philadelphia and co-hosts a weekly book podcast called Overdue.
How to declutter, quiet down, and take the AI out of Windows 11 25H2 Read More »


